The Invacar pair have landed!

I’m pleased to report that the Invacars are home! I scooped them up with a truck last week, as social media followers will already have seen, and they’re now adding some much needed glamour to my garden. Here’s the spares car, basking in the sun.

Invacar rear parts car

The spares project

There could well be some useful bits to be had from this one – the rear window for a start. Don’t fret though. What I don’t use will be sold on. Apparently, even the damaged body could be in demand from those who know how to repair glassfibre.

TWC, the one I’ll be restoring, sits outside my office window. Perhaps this is why I took time out from my busy day job to give her a wash.

Invacar blue three wheeler

A half-clean Invacar. TWC gets a wash.

AC Model 70s had the blue impregnated in the glassfibre apparently, but TWC is an Invacar Model 70, built in Thundersley, Essex – spot the winged badge on the nose, whereas ACs had a roundel. As you can see, my pressure washer did a good job of removing the muck,  but Invacars were painted, and some paint did come off as well. Mind you, I think that just highlights how poor the paint already was in places – it’s very bad on that front cover you can see, even before I started.

With the muck blasted off, I even got some cutting polish out to reduce that big mark on the front wing. The result?

Invacar

TWC all scrubbed up!

That’s better! She’s almost presentable now. I’m thrilled with the makeover. The next day, I set about clearing the broken glass out of TWC, as at some point in the past 14 years, something unfortunate had happened to the rear window. Just as I’d finished doing that, the postman arrived with a special package.

I’ve got the key!

Yes, an FS880 key. I probably shouldn’t tell you this, but nearly all Invacars have the same ruddy key, which is also shared with machinery as diverse as dump trucks and cash machines on some buses apparently.  Quite how one particular key became so popular, I don’t know, but it fitted the ignition switch and works in both doors – albeit one of the locks has semi-seized and I can’t quite unlock it.

I could unlock the rear engine cover though! What would I find beneath it?

Invacar Model 70 engine bay Steyr-Puch aircooled flat twin

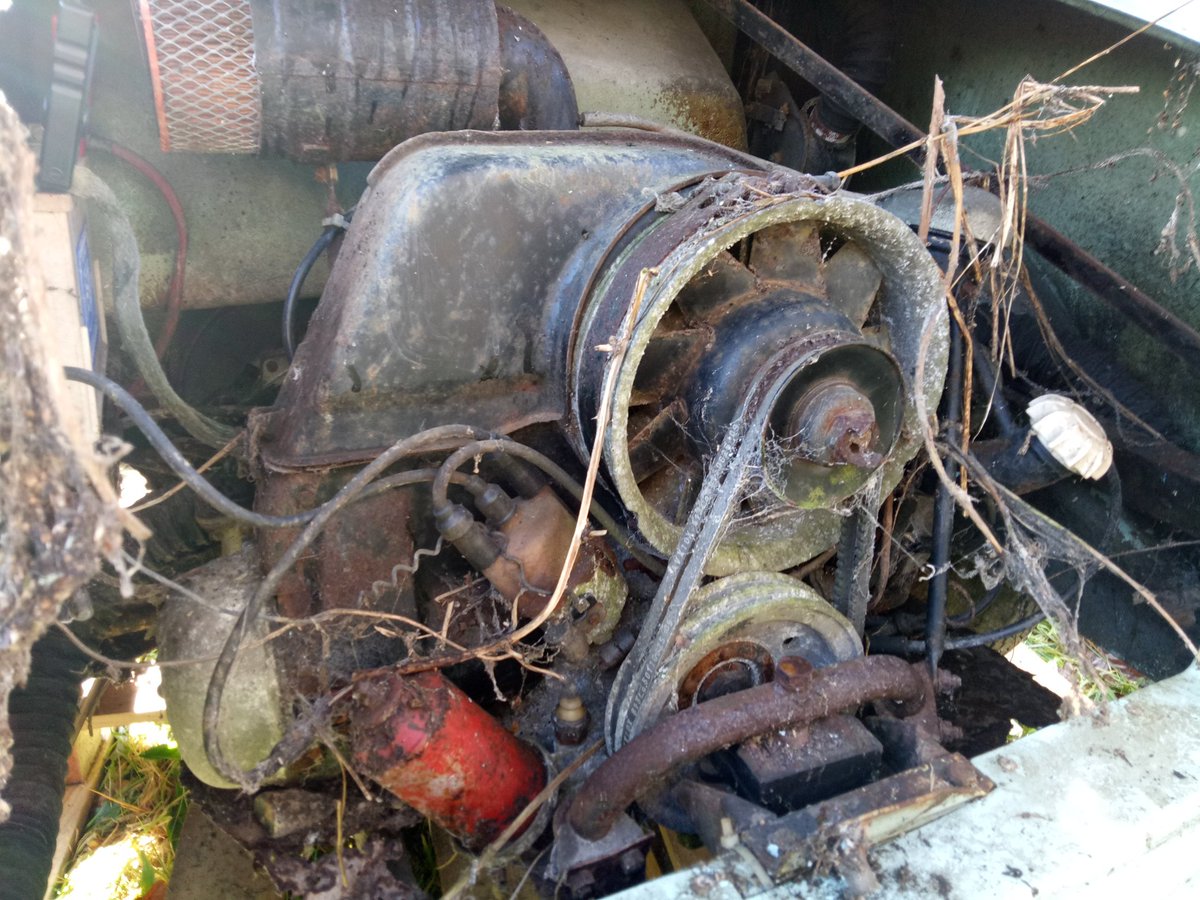
Oooh, an actual engine! May be a little overgrown…

Well, there is an engine at least! I cleared out some of the dead plantlife and one or two cobwebs. I couldn’t turn the crankshaft pulley by hand, so I then whipped out both plugs and squirted in a bit of engine oil. With that done, I then applied a breaker bar gently to the fan, which then applied a turning force to the crank via those twin belts. That replicates the work of the Dynastart, which is housed within that fan. This acts as a starter motor and a generator in one. Clever, a like a lot of two-stroke microcars. I think it’s the first time I’d encountered such a device on a four-stroke engine.

But, I can’t get the engine to complete a full turn. It’s likely that the engine has decoked itself, with large chunks of combustion material in the cylinder head now preventing the piston from achieving full travel. I’ve had this on the 2CV before, when I dragged its spare engine out of my aunt’s damp shed after a decade, and fitted it to the 2CV. That time, I laughed in the face of danger and just started the engine. It’s been fine ever since, but it could also have gone spectacularly wrong, damaging pistons, cylinder head and possibly even crankshaft. So, the sensible thing to do is get the engine out, where it’ll be a lot easier to remove the heads and clean things up.

Probably no bad thing, as the electrics seem entirely dead, even when I connect up a jump pack, so it’s not like I was on the cusp of having it running anyway. The best I’d seen was a very mild flicker from the fuel gauge.

But, working on the car is not really very easy where it is, which was only meant to be a temporary resting place. My neighbours will be happy once I can get TWC rolling, and stash her away in the garage. Elly the 2CV will be happy if she still fits in the garage too…

New tyres and inner tubes are on their way, so hopefully I can achieve some movement before the weekend. It depends how easy it is to free off the brakes. I know the front wheel is turning, but the rears? Not so much…

As for how I got them home, all is revealed in the latest video.


Lexus alternator fix

Well, I’m not sure why I grumbled so much about the Lexus alternator job. Fitting the new one progressed remarkably easily! The full details can be seen in this video.

I still have a broken fan cowling to replace, but I doubt I’ll miss it at this time of year. The good news is that the Lexus has so far covered 260 miles without trouble, though I suspect there’s an exhaust leak on one bank. It’s a bit chuffy at times.

The Lexus rests in Tiverton. No, I couldn’t be bothered to walk outside for a pic.

Still a marvellous way to travel though. It really is very good at eating up the Wales. After whisking us back home tomorrow, I’ll be swapping it for a 7.5 ton truck on Tuesday, in order to collect the Invacars. I suspect that drive won’t be quite so joyous…


Project Bluebird: The first 730 miles

I should probably do an update on Project Bluebird, seeing as I have actually been able to drive it. Hoorah!

As related last time, I was forced to park the Bluebird up after its first trip out, as the shock absorbers were dangerously shot. KYB kindly supplied a set of its excel-g gas shock absorbers, after I asked for advice about trying to improve things beyond standard. Gas shock absorbers, or dampers, use nitrogen gas to control the springing of the car – literally damping things down. Now, I’m quite used to the damping effects of nitrogen after many years of driving hydraulic Citroens. The main benefit is that the damping range does not change, whereas hydraulic dampers will suffer a loss of damping ability as the oil heats up, and the viscosity changes.

Bluebird gets some love, and DFTR Automotive, Dudley.

I visited DFTR Automotive in Dudley for the fitting, knowing that Dean has a good chunk of experience having worked on these cars when they were new, though Mazda rotaries are the main love of this family-owned firm. With a two-post lift and power tools, the front struts were removed, the springs compressed and the new dampers fitted in no time at all. The nearside front, as I suspected, was in terrible condition.

The rear was more involved, mostly because the rear seat needs removing to access the upper strut mounts – not an issue if the spec includes a folding rear seat, or if you have a hatchback. The seat clips really didn’t want to give up their hold on the seat, but we got there in the end. Removing the struts is also a bit more involved, with the multiple suspension links needing to be removed, and the brakes before you can pull the strut out. Still, a few hours work and the Bluebird was feeling a whole lot better.

Back seat needs removing on Bluebird saloon.

In fact, the difference could barely be more marked. I’ve just changed the dampers on the 2CV too, though that transformation was more marked. The 2CV is now limousine-smooth once more, while the Bluebird still rides like Bluebirds always did – a touch bouncy at times and you know about every bump you hit.

The transformation has come in terms of handling, though. I can now safely chuck the car into a bend and know it’ll track neatly around it, even if I hit a bump mid-bend. Even when you aren’t walloping into bumps, it still corners much more neatly. Body roll is better controlled, and its horrible habit of lurching mid-bend has utterly gone. Sure, it’s still no sports car, but I can once again corner with enthusiasm. I live in Wales. This is how I drive very often.

Today, there was further work to do, as I set about retorquing the cylinder head bolts. This should be done after 600 miles, but I thought 730 would do, as that’s what I’d covered. I imagine a lot of cars miss this essential step, which is perhaps why so many cars suffer head gasket failure after a repair. It isn’t particularly hard to do, though the fuel pump needs removing to provide adequate access to one of the bolts – just two nuts and it’s away.

With that done, I could check the valve clearances. Annoyingly, the head bolts should be tightened with the engine cold, but it’s best to check the valve clearances hot. That meant putting the rocker cover back on and running the engine up to temperature before taking it back off again. A couple of clearances were a bit slack, something given away by the slightly tappy nature of the engine. That’s perhaps because I’d set them cold initially, as I knew I’d have to reset them later anyway, after re-torquing the head. I’d set them a little on the generous side back then.

I also disconnected the manifold-to-downpipe joint, as the gasket on it is very poor. It didn’t have one at all when I got it, but the gasket I had in my gasket kit was a poor fit. I slapped a load of exhaust paste around and did it back up. The result is that it is now much quieter.

Looking good! A quick clean makes all the difference.

Having given the Bluebird a wash ahead of a local show, this really is starting to look and sound like a car that has been vastly improved since purchase back in May. There are still some issues – a leaky sunroof (the frame that holds the glass is rusty), a cracked dashboard and the heater matrix is still slightly clogged. Plenty to be cracking on with then, as the car settles in to shared daily driver duty. I think I might quite like it though…

Project Bluebird: Actually works!

Apologies for the delay in updating you on the Bluebird project. Things have been pretty crazily busy of late, especially now there are five vehicles on the fleet to try and keep in working order.

Sticking with the Bluebird, I decided to give it a bit more love before the MOT test. Liqui Moly recommended its mOs2 oil, in 10w40 flavour, which was certainly going to be a lot better than the 30 grade stuff I’d lobbed in as a flush – there was a lot of mayonnaise-like gunk to clear out.

Oil change! Thanks Liqui Moly.

With that done, I could finally drive to the MOT station. A steep downhill section allowed me to clean up the brakes ahead of the test, though I was disappointed to note that the engine was not holding temperature, despite a new thermostat. I’d worry about that later. Now for the test!

On the rollers! MOT time.

Unsurprisingly, it failed. I knew something was amiss up front, though oddly the inner track rod ends are not apparently an MOT failure. The tester didn’t like them though, so I got a dangerous advisory. Rightly so. There was also a split CV gaiter, a loose rear wheel bearing and an insecure headlamp (with the reflector insecure inside it for bonus points). Oh, and a split wiper blade I’d failed to spot.

I gave the go-ahead for the work, which added another £220 or so to the cost of this project, probably nudging me into four figures if I dared add it all up. To avoid upsetting myself, I shall not. However, this was it. I could drive home! So I did.

Project Bluebird has its first legal drive.

I decided shortly afterwards to investigate the thermostat. Sure enough, it had come slightly adrift the last time I took the housing off, so that’s my own fault. However, with everything back together again, the heater just would not get hot.

Today, I finally found out why.

Yes, that’s a lot of silt! Quite tricky to do while holding a camera, but the result is a heater that actually works. Hoorah!

Which leaves me with a Bluebird that now runs nicely, cools nicely and is ready for Festival of the Unexceptional this coming Saturday. I’ve covered about 70 miles in the car now, but this’ll still be the longest trip so far. Before then, I just want to be confident that my cooling issues are now resolved, before trying some Evans Waterless coolant. I’ll let you know how that goes in a future post.

Project Bluebird is ready to go!

EDIT – Now with another video update, including first drive!

Project Bluebird: Not progress

Well, that’s not entirely true. There has been progress. It just doesn’t feel like it.

Mostly, today has involved putting the engine back together. I decided the cam timing was fine, so set the rocker gaps, refitted the distributor, reassembled the timing cover and set about the truly horrendous business of reattaching the inlet manifold. The bolts would be a lot easier to access if someone hadn’t put an inlet manifold in the way. I was sweating buckets, and as I shed moisture, I decided it’d be a good idea for the engine to do likewise. So, I drained the creamy oil out of it and lobbed in some 30 grade stuff I had kicking about, watered down with some 5w30. It won’t be in there long. It’s effectively a flush. There may also have been tea.

Sun, tea, Bluebird, but little joy.

I then set about refitting the HT leads, though leads 1 and 2 are very similar lengths, making it hard to know which way around they should go. I cleverly marked them at the dizzy cap end, but had to refer to the manual to work out the firing order. It was time to get brave and actually operate The Starter Motor.

The resulting noise was slightly curious, but nonetheless, the engine seemed to spin merrily. I had already spun it over by hand a good few times, to ensure it would actually turn over without going CLANK. But, the battery was clearly rather low, so assistance was sought.

One small jump pack.

I now reconnected the coil king lead, and prepared myself for the truly exciting moment. Actually starting the engine! Only it wouldn’t start. Reasoning that the carb bowls were probably empty after several weeks of being open to the elements (well, air at least), I sloshed a little fuel into the carb and tried again.

It caught, blue smoke poured from the exhaust, but that’s fine – I deliberately left a little oil in the bores when the head was off. It screeched. Er, that’s not meant to happen! It stumbled. It generally sounded like it was running on two cylinders. I turned it off, swapped the two suspect HT leads and it was even worse. I was right the first time! But, it still screeches (stops when you apply throttle) and will not run on all cylinders.

I’ve since discovered that the pipe from the PCV (positive crankcase ventilation) valve was split. In fact, I then discovered there was a bodged bit of plastic pipe that was missing. Could that explain the screech? It’s either that or I’ve got a very slight leak on the inlet manifold, and that’s a horror too terrible to contemplate. I do not want to take the sodding thing off again.

At this stage, I completely ran out of time and had to go out to a meeting. Even worse, I had to take minutes, which I need to write up. Instead, I’m writing this. I’m now away for a few days, then seriously busy with work, so have no idea when I’ll get this sodding car sorted out.

This year is not working out very well on the car purchase front.

Project Bluebird: Slow going

Sorry for the radio silence, but getting the latest issue of Retro Japanese magazine to the print was rather more important than getting my Bluebird up and running. Mind you, it was good I was in no rush really!

Having discovered that the cylinder head was in no fit state to go back on, with very bad pitting and erosion around cylinder number four, I took the head down to Hargreaves Engineering in Carmarthen. That’s a bit of a trek, but they were recommended by people I know. Recommendations count for a lot in this game. I was impressed as Adam talked me through the work needed too, as per my previous post.

This week, I finally got to return and pick up the head. As the rain seemed to be keeping off, I decided to take the 2CV again, despite the fact the idle was iffy.

Elly at Hargreaves Engineering.

On arrival, the extra work was discussed, payment was made (about £150 worth of work here, the cost of the car keeps going up!) and Adam even cleaned out the idle jet on the 2CV after lending me a spanner to remove it. Very kind! Idle restored, I then drove home.

With the deadline out of the way, I thought I might as well crack on and get the head back in place. The new gasket was dropped on, and that was about as far as I could get until I borrowed a torque wrench (mine is a tiddler that isn’t up to head bolt torques).

Head reunited with car.

Then I discovered that the camshaft timing seemed to be out compared to the belt position. The camshaft pulley only fits in one place, and that place appeared to be three teeth out. Friendly folk have suggested this may be because the belt is still under tension from the ,er, tensioner. Ugh. This wasn’t going to be as quick and easy as I’d hoped.

So, the head is back in place, but I now need to work out how to get the crankshaft pulley off, all so I can remove the lower timing belt cover and access the tensioner bolts. The thought had crossed my mind that I could just drill a hole, but that’s probably silly.

Meanwhile, the Nippa has eaten its brakes, so that’s crying out for attention too.

Eesh! Not a nice discovery.

Bit ashamed of that one, though as low pads weren’t an advisory on the MOT, I suspect that one, or perhaps both of the calipers have begun to seize, hastening the demise. Indeed, Rachel told me it felt like they were binding on her most recent trip – you can’t afford binding brakes with only 40bhp! That is metal-on-metal there, hence the glitter and utterly ruined disc. I now need to source new calipers, or at least a rebuild kit. So far, not had much luck.

Which all means I’m not entirely sure when I’ll get the Nissan up and running. The next magazine deadline isn’t a million miles away, so my window of opportunity is small. Annoyingly, the MOT is up on Monday as well. Going well then!

Project Bluebird: Head off, issues…

I think I like this car. You see, it’s very easy to work on – apart from the horrible location of the spark plugs. That’s good, because I started dismantling the engine without a manual. It must be easy though, because I managed it. I must pay credit to Japanese-spec bolts. After years of working on British and French motors, I half-expect every single bolt to snap. Not Japanese ones though, seemingly the same even when the car is built in the North East of England. There’s a delicious crack, and then the bolt simply comes undone. Even the long bolt that goes into the ‘stat housing, and which looked like it had lived in the sea for 20 years, came out with very little argument. I like that.

No special tools were needed either, with most bolts and nuts 12mm, 14mm or 17mm, the latter just for the exhaust manifold-to-downpipe. Good penetrating oil (I like the No Nonsense stuff from Screwfix, even if it really does pong) helps of course. Before long, I was able to lift the head free and inspect the damage.

Here’s the old cylinder head gasket.

I suspected cylinder three was at fault, due to a mouldy spark plug, and I was not wrong. The surprise was that cylinder four had also blown. If anything, this one was even worse, and looked pretty old. The edge of the combustion chamber looked like it had been nibbled away.

Aluminium-eating mice have been here.

Damage such as this is often caused by water leaking in, then getting superheated by combustion, putting too much strain on the aluminium. As well as this, there was, as you can see, a great deal of pitting. This was after I’d deployed some ‘home-brew’ magic too – a sheet of sandpaper under plate glass, to keep it smooth and level. In theory, it would have been sufficient to clean things up. In practice, it did a great job of removing bits of old gasket, but the damage was too severe for that technique to work.

So, I headed off to a machine shop – quite a trek down to Carmarthen to find one recommended by friends. I’m glad I did travel so far, because Adam at Hargreaves Engineering was certainly very knowledgeable, and had no problems with me hanging around to take photos.

After removing the camshaft pulley, Adam loaded the head into the milling machine. A ferocious looking bit spins around a wide circle in this machine, which can be precision-controlled to take very small amounts away. The first rough cut left a crinkle-finish, but allowed Adam to confirm that we would be able to get deep enough to take out some of the low points in the head.

Rough-skim gets us started.

You can certainly see the wide arc the milling machine makes as it passes over the head – or, rather, as the head passes beneath the cutter. Having confirmed that all was ok, Adam could then slow down the table, to give the final clean finish.

Voila! Skimmed clean.

There’s not a lot that can be done about the corrosion around the water ports – that’s what you get when you don’t replace your antifreeze regularly. In fact, some of these ports were entirely blocked. Five years is considered a suitable maximum for OAT coolant, but older types should be changed every couple of years – and rarely are.

Next, Adam tested the valve seats. Put simply, if the valve can’t hold a vacuum when one is applied to the relevant port, then it isn’t seating properly, which means combustion pressure is lost, which means efficiency is lost – more fuel, less power.

Big breaths…

That’s a duff inlet valve being tested there. It could generate very little vacuum pressure. The inlet on cylinder four, and most of the exhaust valves, also gave a poor reading. This means the valve seats at least need cleaning up with a lap, if not recutting, which means all the valves need to come out. This job had suddenly got a fair bit bigger. All of which means it’s going to be a couple more weeks before I can actually drive my Bluebird. Oh well! See below for a nice shot of it, taken before the dreadful Daimler departed. Yes, it’s gone!

One day, I might get to drive it…

Finally, here’s a video of the first stage of the cylinder head gasket replacement tale.

Project Bluebird: It begins

I’m well into the head gasket swap on the Bluebird, but it hasn’t been easy. I don’t have a manual for the car, so I’m just guessing as I go. The thermostat is missing, so it’s clear that it has had cooling issues for some times. However, I’ve just stopped for lunch, and the good news is that if I can get the last head bolt undone, I should be able to get the head off!

I wasn’t thrilled about having to use a breaker bar to get the spark plugs out. They’ve clearly been there a while. Number 3 shows signs of mould, so I’m guessing that’s where the leak is!

Clambering into the engine bay, struggling with plugs.

Once I got the cam cover off, head gasket failure was confirmed by loads of creamy deposits – your classic emulsion or mayonnaise.

If your engine oil looks like this, it’s bad news!

I’ve got both manifolds off now and it’s getting close to time to lift the head off. I wonder what I’ll find beneath it? While I’m at it, assuming the engine is ok, I’ll put a new timing belt, water pump and tensioner on it.

In the meantime, here’s the latest video – all about the Bluebird.

Project Dirty Daimler: Flip-flopping

Having convinced myself that the best thing to do with the Daimler was wash my hands of it, I naturally changed my mind. This is only a quick post to say that I did some ferreting about, and got the horn working! Cleaning up relay contacts seemed to cure that. Windscreen washers are still an issue, but I have confirmed power from the stalk to the relay, so assume it’s the pump that is duff. I have some ingenious plans to try and deal with that. Or, rather, I did, because they it wouldn’t run.

It has become seriously, seriously rich for reasons unknow. I pulled the plugs and they looked like this.

Eesh! Mucky plugs dot com.

I’ve no idea what has gone wrong, as I’m pretty sure I’ve not touched anything that could cause this level of richness. Now, it could just be the fact that the car has barely moved since landing back from Glasgow, and it has a duff oxygen sensor. That means it has been running slightly rich the whole time. Several cold starts and barely any getting up to temperature could be enough to choke the engine up perhaps? I’ve no idea. I haven’t really got time to explore any more, because the next issue of Classic Jaguar magazine is not going to edit itself!

On that front, there’s some very interesting content coming your way, including full details of the Daimler collection caper! It might not be the project car I’d hoped, but this machine does still seem to be generating copy.

Project OMG: Cosmetics and rot control

It’s a Saturday, and it’s not actually raining, so I finally had a chance to do some rust-proofing and cosmetic improvements on the Omega. First job was to reverse it up my ramps and get underneath with a wire brush and some rust converter. Vactan is my converter of choice. It’s bloomin’ good stuff, and dries to a nice, black finish that can be overpainted or waxed. There was a soft spot midway along the offside sill, which thankfully was still solid. I rubbed it back and dabbed on the Vactan. I also rubbed at surface rust in various locations around the rear axle. Reassuringly solid back here. With that done, I could apply wax – Bilt Hamber’s Dynax UB (Under Body) in this case. It’s very easy to apply, coming nicely out of the can even on a cool day.

Bilt Hamber’s excellent underbody wax.

The rear brake pipes and tow bar were also treated to a dose as surface rust was present on both. I think I may have found where the diesel smell is coming from too – there’s a small pipe that I suspect is the return, though it could be the main feed pipe for all I know. It’s just slightly damp. I will investigate that one further.

With waxing done, I set about applying Autoglym’s Bumper and Trim gel to the rear bumper. It had faded pretty badly, as you can see in this shot.

Yup, you can spot the difference.

I’ll admit that I’m lazy. I could have revived the plastics with boiled linseed oil (I don’t have any) or an airgun (don’t have one), but this stuff works well. These potions never seem to last that long, but the Autoglym stuff seems better than some Meguiar’s stuff I have, which fades again within a couple of weeks. The Autoglym stuff is also much easier to spell. I also applied it to the rear lights, though I haven’t yet done the trims on the tailgate itself. They don’t seem to have faded much at all, perhaps because they’re vertical rather than horizontal?

Looking good!

The end result is a car which certainly looks better, and which hopefully won’t rot away too readily. I’m now seeking some rear seals for the diff, to cure a minor leak (£21 each from Vauxhall, eep!), and I really need to get my hands on new brake discs and pads and probably flush the brake lines. It really doesn’t stop as well as it should. It does stop, and is MOT legal, but it doesn’t exactly inspire confidence, especially given how little engine braking you get (ie none, because the gearbox has a built-in freewheel function).

It’s coming along though. The main issue is that other cars on the fleet also need some TLC.