Project OMG: Stopping the leak

Now with video! See lower down.

There was a bonus this morning, when the seal kit for the Omega arrived earlier than expected. To recap, the Omega had a declared fuel leak when I got it, which I just about managed to stem for an MOT, but which very much still needed doing. Leaks from these Bosch diesel injector pumps seem very common – to the point that you can’t help thinking there must have been a better way…

Having already removed the inlet manifold, it didn’t take long to pull the pump to bits. I first marked the sides, as positioning is very important (as I’d soon find out!). I’d already smashed a 7mm socket onto the anti-tamper screw, and cracked that off, so it really was just a simple case of undoing four bolts, removing the lid, then undoing three more to get the next level off. I used plenty of blue rags to catch the diesel that spills during this operation, and I’d thoroughly degreased the pump and surrounding area. Cleanliness is good!

The new seals were fitted – one of the old ones just fell out, and the other didn’t need much coaxing. The new ones simply push in. I put the pump back together, but didn’t fully tighten the base screws. These need to be left for fine-tuning. In short, if this part of the pump is not exactly where it needs to be, the fuelling will be out. At best, the car will run poorly. At worst, the car won’t run at all.

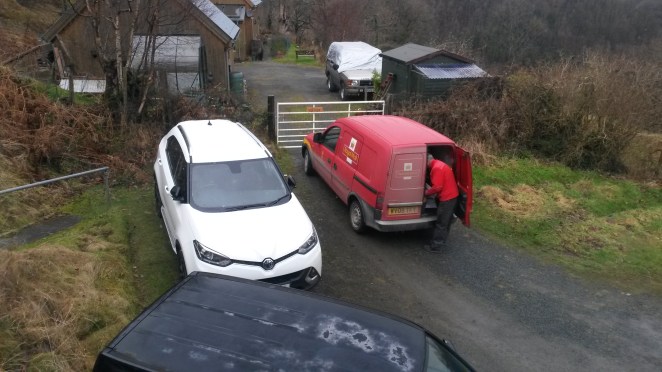
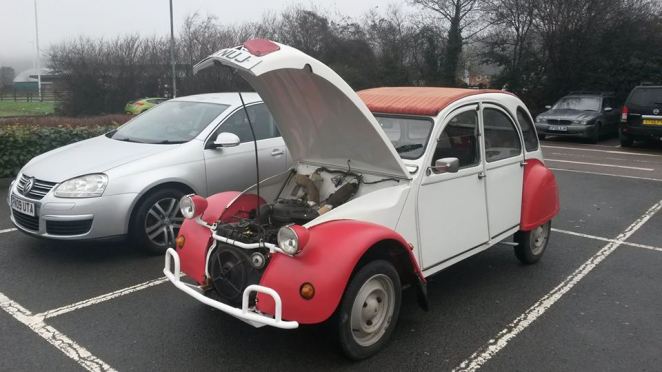
It was at this stage that I discovered that the battery was flat. It just about had enough juice to illuminate the dash lights, but not enough to turn the engine. Unfortunately for me, the car was parked in a manner that left it impossible to get a car in front of it. The 2CV (just because it was there) was just able to pull the Omega backwards, so I could then squeeze the Honda S-MX in to provide some much-needed charge.

My black, Japanese jump pack.

My black, Japanese jump pack.

Incidentally, the tiny li-ion jump pack I have was not even remotely interested in starting a high-compression, 2.5-litre turbo diesel engine. Nor was my ancient Halfords lead acid jump pack, though that hasn’t been that keen on starting a 2CV engine lately…

The Honda hurled volts at the Omega, and it then burst very noisily into life – on account of having no inlet manifold fitted, and also the EGR pipe venting to atmosphere in the engine bay. It sounded awful, not settling to an even idle. As the pump filled up with fuel again (replacing what was lost), the revs suddenly rose alarmingly. I quickly turned off. This is a real danger, so never walk away from the car if starting it in these conditions. Keep your hand on the key!

I then slackened off the lower pump bolts, and gave it a few taps forward using a wooden hammer handle. Don’t hit the pump with the metal part of the hammer, or you’ll damage it. I tried starting it again. Uneven and awful. Off again and a further tweak. Now it seemed to run nicely. Brilliant! I then set about tightening the bolts and refitting the inlet manifold. I missed a key stage here, which we’ll get to in a minute!

Refitting the manifold was a right faff, as it’s very easy to lose the nuts that hold it in place. Six are easily accessible above the manifold. The other six require you to get them in place where your hands can’t reach. I lost two and had to remove the manifold again. Stuffing a bit of rag in the socket helped keep the nuts in place until they were seated. I wish I’d thought of that earlier…

I also wish I’d taken more photos, but time was very much being munched away. I needed to crack on.

With the engine back together again, I fired it up. Oh dear. It was lumpy, prone to surging and chucked out loads of soot. This didn’t look right at all. The problem is, you need to keep the engine running while you tighten down those pump bolts, as even that slight movement can disrupt the fuelling. I was going to have to pull that sodding manifold off again.

With the pump now accessible once more, I loosened the bolts and started the engine. Still lumpy, so at least I knew the problem wasn’t manifold related. I tapped the pump forward, it was still bad. I kept going (we’re talking very small movements here) and bingo! Suddenly it began running sweetly again. I left the engine running this time, and tightened the bolts. That upset it again, so I backed them off once more and nudged the upper pump section forward a little more. Tightening it this time made no difference to the running. Success!

Back on with the manifold and, despite my best efforts, I still managed to lose a manifold nut. Like my old XM, this is one of those annoying bloody cars where if you drop something, the chances of it reaching the ground are pretty much nil. I couldn’t find it but thankfully, a 13mm-headed nut with washer was a fine replacement. Reaching the rear-most nuts is a particular challenge, that left me ‘planking’ atop the engine. I’m glad no-one saw me.

With it all back together once more, I could hook up the jump leads AGAIN and bask in the cheering warble of six happy cylinders. A test drive revealed that all was well, and no longer was there a hideous stench of diesel every time I stopped. The test drive was about four miles, and I left the car running to hopefully recharge the battery. That’s two batteries out of four on the fleet that are far from happy, and both are on cars that were off the road for over 18 months…

Fixed! No leak, smooth running. Phew!

Fixed! No leak, smooth running. Phew!

It’s all very pleasing, and leaves me looking forward to cracking on with other jobs. This poor car really is overdue a service, and I’d still like to sort out the unchanged rear spring. It is rather overdue a wash too. I’m sure that’ll remind me of how big it is!

A video of today’s adventure will be forthcoming. EDIT – and is now here!

The Art of Bodgery – aluminium tape

When you drive old cars, you’re forced to be resourceful. You need to be able to diagnose noises. Is that a ‘stop right now’ sort of a noise, or a ‘push on to the next safe stoppign place’ noise, or a ‘meh, I can safely ignore that’ noise? You may also need to deploy cunning fixes to get you on your way. I once had to tie on a shock absorber with speaker wire after a mounting snapped and have become quite good at driving a car with a broken clutch cable.

One of my favourite ‘bodge’ materials is aluminium tape. It can cover holes in bodywork if you’ve got leakage, and, as I discovered this weekend, you can just about use it to stem a leak from a diesel pump. It isn’t ideal for that though. Where it really scores is for exhaust bodgery!

The bodger's friend - aluminium tape.

The bodger’s friend – aluminium tape.

For the second time in a week, I was forced to deploy this most marvellous of materials, as the Nippa was getting noticeably throaty in the exhaust department. Not a bad thing perhaps, but the neighbours might not agree.

The exhaust system is utterly shot to be honest. It had a welded repair last year, but the whole system is flaking away. There was a hole just before the rear silencer though. Perfect for a bit of tape!

Who need's a proper bandage?

Who need’s a proper bandage?

Now, you can get exhaust bandages to offer a more robust bodge, but they’re not necessarily very cheap. At £7 for a roll, this tape offers great value. There’s enough to ‘repair’ several exhausts! I wrap on a few layers, and try to get high-tack tape. Ultimately, this exhaust still needs to be replaced, but this is good enough to pass an MOT, and saves you the embarrassment of driving around in a car that sounds like it is farting loudly. A few seconds’ work and it’ll sound good as new. It is no longer an immediate concern.

I know it’s good enough to pass an MOT, as part of the Omega’s work was doing the same.

Omega passed an MOT like this.

Omega passed an MOT like this.

The MOT merely states that there should be no leaking gases, so it’s absolutely fine. As you can see, the Omega’s patch is still holding up, even after 100 miles of driving. It gives me the luxury of time to find the best deal on a replacement system, and, more importantly perhaps, it enabled me to drive home legally.

Sure, the aluminium tape wasn’t enough to really fix the diesel leak, but it did slow things down a great deal. That was a more temporary bodge solution, but one which achieved the desired response. I far prefer this stuff to gaffer tape, which can leave particularly nasty gluey mess where used. In fact, aluminium tape has become an essential part of this bodger’s toolkit.

Project OMG: Oh dear

Well, I can’t say today hasn’t gone to plan, because I had always assumed problems could occur. Having had the MOT fail, the next problem was fixing the issues. Our initial garages were too busy, but a friend recommended a garage in Wiltshire. So, I gave them a call and headed over. We quickly diagnosed that the diesel leak is the top gasket on the pump. Simple to fix, if and when I can get a gasket. That gave enough confidence to address the spring. Ashley at Mermaid motor services had already ordered the spring, which turned up just as the broken one had been removed.

There was an issue though. It was not identical.

That’s the broken one on the left. It seems replacement springs for Omegas with self levelling are not available. Oh dear.

We fitted the wrong spring, and the car feels fine. I will need to correct this at some point, or at least get a balance across the car!

So, that’s one of the three fails dealt with. I need to get the right gasket to deal with the pump tomorrow – any help there appreciated – and get an exhaust bandage to bodge that up.

I was feeling very stuck, but then my mate Stephen Doel magically appeared and offered me food and warmth! The project is now on hold for the evening. I haz cats!

2CV: Rear brake overhaul

During the 2CV’s rebuild, most mechanical items were considered off-limits. The focus was to get the car back on the road, and as it was running fine when it came off the road, I was hoping not to have to do much. After putting the body back on, I had to refit the brake master cylinder. As that had been off, I then had to bleed the system. This is where problems started, as the nearside rear bleed nipple made it apparent that it wasn’t for moving. It was the iron oxide. The poor nipple had lost its cover, and Welsh weather had caused it to rust. I decided not to fight with it, as the last thing I wanted to do was render the brake system inoperable. Instead, I reasoned that in all likeliness, very little air would have got into the line, and I could get rid of any fresh air via the other nipple. In this, amazingly, I was proved correct. A lot of air came out – trapped between the old fluid and the new stuff in the refitted master cylinder. The brakes passed muster for the MOT.

Obviously, this wasn’t a situation I was happy to live with. I would far rather have a fully bled brake system. So, the other day, I had a go at freeing of the nipple. It snapped off in response. So, today, I booked in with Sparrow Automotive for some very necessary overhaul work. You see, the problem is, you need a 44mm socket to remove a 2CV rear brake drum and bearing. You also need a whopping 250-290lb/ft of torque to undo it. That’s ten times what the 2CV’s engine can produce! I have neither of these requirements, so a visit to Sparrow was in order. I had to get up horribly early for this, though as it happens, George the cat decided to wake us up ten minutes before my 7am alarm… About an hour later, I was here.

A very good morning.

A very good morning.

Yes, roof back on the Elan Valley Mountain road, enjoying the sunrise. Gosh, sometimes it really does feel good to be alive! I’d wrapped up well, and it wasn’t that cold, so I thought I’d leave the roof off.

Some miles later, that plan changed.

See? England just isn't as pleasant.

See? England just isn’t as pleasant.

I’d started to see frost at the side of the road as I neared the border, and then it turned foggy. Suddenly, I found myself rather suffering from excessive cold air. Time to stop and put the roof back on. It was so cold that the straps that hold the roof back had shrunk! I couldn’t get them to fit in their ‘rest’ position. I was certainly justified in keeping the grille muff on. The heater was working well and I soon defrosted.

What a mucky drive!

What a mucky drive!

There were other issues though. I got through so much screenwash. At times, I seemed to be pressing the squeezy-button with my thumb almost constantly. Headlamp performance was certainly rather worse by the time I arrived in Hereford.

Time to crack on, as Elly was squeezed into the workshop along with some custom vehicles of the type Sparrow Automotive rather excels at.

A BMW-bike engine installation, and a hot rod 2CV. Ace!

A BMW-bike engine installation, and a hot rod 2CV. Ace!

Work began and, with the benefit of air tools, the hub nut (ahem) was soon removed, and the wheel cylinder replaced with a fresh one – that didn’t have a broken nipple in it.

Bye bye knackered nipple.

Bye bye knackered nipple.

At this stage, we discovered that the pivots for the shoes were in a pretty poor state. One clue to this was the rather firm brake pedal. The pivots often seize up but, because the rear brakes do still operate, 2CVs can often pass an MOT test even when the brakes are not doing much stopping! Another clue for me is when I went hooning last Saturday. After a particularly long descent, the front brakes started groaning. That’s a sign that they’ve been working hard. Given I hadn’t been braking that hard, it suggested they were doing most of the stopping. So, everything was stripped and cleaned up.

Oddly, the 2CV appeared to be wearing a mis-matched set of shoes. It’s years since I last had a peek at the rear brakes (due to that nut issue), so I’d taken the liberty of bringing a fresh set of shoes that had come to me in a rather large collection of 2CV bits. Well, they might as well be fitted now we’re here. The only problem was that the four adjusters (one for each shoe) were very seized. Three responded to smacks with a hammer and a dose of penetrating oil, but one just wanted to round. There was only one thing to do. Deploy a Joey!

Chop chop!

Chop chop!

Joey is the very-talented friend who welded up Elly’s front wings. She’s darned good at what she does, and far safer with an angle grinder than I am. In other words, she only cuts what actually needs cutting…

A new adjuster from Dutch 2CV specialists Burton was fitted, then the new shoes and, finally, a pair of brand spanking new hub nuts. Now, the brake system could be bled properly at last.

Oh what a difference! Now, the brake pedal travels much more. In fact, Pete Sparrow told me that customers often complain that the brakes feel worse after he’s sorted them out, because they’re not used to the pedal actually travelling! The shoes still need to be bedded in, so I haven’t been pushing the brakes hard, but the car now squats much more evenly when I brake, without the comedic nose-down stance it had previously had. If you own a 2CV, I certainly recommend that you make sure the rear brakes are working properly. You might not know just how bad they actually are!

With the work done, I could then set about the 1.5-hour drive back home.

A filthy Elly pauses on the way home.

A filthy Elly pauses on the way home.

It’s very nice to have that job done, though the trip did remind me of two other things. One, I need to do something about noise levels. Two, I need to do something about comfort! I may have to refit the bench seat…

Wash and push up (tyre pressures)

I’m still feeling a bit groggy this week, the result of a heavy cold followed by gripey guts. I think the 281-mile drive in the 2CV may not have helped. It was hard work! I have no regrets though. It was a top day out.

Still, it left the 2CV filthy and, despite grogginess, I felt I had to give her a wash – seeing as Wales had decided to be rather pleasant in the weather stakes. That doesn’t necessarily happen often.

Clean again!

Clean again!

In this shot, you really can see how ‘pink’ the front wings are compared to the rears. I’ll be painting all the red bits to match at some point, honest! I still need to sort out some side stripes as well.

It was the first time I’ve washed this car in getting on for two years, and there wasn’t much point doing it last time! It feels more rewarding when the car looks nice at the end of it. There are still areas where there’s wax clearly visible – down the rear door for a start. I’d rather have those areas protected by wax than looking immaculate though.

After a break, in which I may have watched snooker, I decided to give the other members of the fleet a check-over. I’m glad I did, as the tyre pressures were low on the Honda and the Nippa – not vastly so on the Honda, but 20psi at the front of the Nippa when it should be 32! I’m forced to admit, I haven’t checked the pressures on that car since the tyres were fitted almost two years ago…

Check your tyre pressures! These were all low.

Check your tyre pressures! These were all low.

The final bit of ‘maintenance’ was to open up the ZX while it sat in the sun, to try and allow the floors to dry out. There’s clearly a bad water leak somewhere (thankfully it doesn’t smell of engine coolant, so not the heater matrix, which is common) but my appetite to investigate is not really there.

To return to the Nippa, it’s been an awesome buy for £300. For the first MOT in our ownership, it needed a steering rack gaiter. For the second, it needed wiper blades. It’s due again in March. We’ll see how it does this time. Motoring does not get a lot cheaper though.

Project Elly: The End!

EDIT – now with video! Scroll down

No, don’t worry. Not The End of Elly, I’m just formally closing Project Elly. She is back on the road and, she appears to be reliable again. Hoorah! Time to step away from the project and steer her back into regular use.

I eagerly awaited the postman this morning, because I knew he’d have goodies for me – or rather, Elly.

Hello Mr Postman! What have you got for me?

Hello Mr Postman! What have you got for me?

I wasn’t disappointed. My ECAS 2CV Parts order had arrived!

Cor! A lovely, new, resin-filled coil.

Cor! A lovely, new, resin-filled coil.

I had to pay attention fitting it, as it seems it’s imperative that the positive and negative connections are the right way around. This differs from the normal coil. In fact, it’s actually sensible to swap the connections every now and then to even up wear on the spark plugs due to the wasted spark system the 2CV employs (in short, no distributor, so it sparks on both cylinders twice during the four-stroke cycle).

With it fitted, and with the ignition now being back on the points-assisted Velleman kit, she fired very promptly into life. Brilliant! Naturally, I ignored my substantial work load and went for a drive. At last! I could drive along with the engine firing cleanly, even after pulling over and letting her tickover for a while as I took photos. There was no spluttering, no misfiring. Phew!

Finally, she is finished and healthy!

Finally, she is finished and healthy!

Of course, there’s not really any such thing as finished. The grey wheels look wrong – they should be white. I also need to get the rear seat fitted, and sort out some sound proofing as she’s LOUD. The grey felt on the interior body sides needs purchasing and fitting, the gearbox oil needs replacing, the reverse light also needs to actually be fitted and I’d like to sort out an interior light. Then there’s the rear wings that need painting, and the side stripes that need recreating (I’m pondering options here – I still fancy a bit of an art project). Oh, and the hatchback kit. That needs fitting, but I also need to get a hinge made up to complete it first.

But, she’s very much back, and that makes me very happy. A lot of people have donated funds, parts, advice and support during this project. I can’t thank you enough. Alan at Citwins turned a complete wreck of a 2CV body into what you see here, with the frightening number of replacement panels needed funded directly by your contributions. That was over £1100. If there’s anything I’ve learnt during this project, it is that the 2CV is supported SUPERBLY well when it comes to parts. We are very, very lucky.

As am I. I’m able to drive my 2CV again. For that, I’m truly grateful.

Thank you!

Thank you!


Project Elly: Spluttering encore

This morning, I got up surprisingly early (for a Saturday) and headed back to the garage once more. I’d left Elly in a state of undress the night before (this line is especially for Sean Lyon) having utterly failed to get the ignition timing to behave as it should. Setting it bang on the manufacturers mark resulted in an engine that would not start.

I recalled having issues with this points box in the Dyane, so I removed it, grabbed Elly’s original points box, and fitted a new condenser to it, then reinstalled it. The ignition timing was reset as per the mark, and she fired very sweetly into life. Result!

Now that she’s road legal, I was able to indulge in a test drive. Certainly, on the four miles to the nearest petrol station, she felt like a car transformed. She was pulling much more cleanly than yesterday, with no hint of misfiring or spluttering. 18 litres of unleaded were poured into the tank, her first fill for almost two years, and I set off to do a full lap of the A44 and A4120 back home.

As we excited the excitingly-named Lovesgrove roundabout, I detected a misfire. Just the once, but definitely there. This was joined by further misfires as we snaked our way towards Aberystwyth. At Llanbadarn Fawr, things got pretty nasty. As I went to pull away at a mini roundabout, she began firing on one cylinder, threatening to conk out (in a manner that suggested she would not then restart). This felt familiar! Somehow, I coaxed her through the pair of mini roundabouts, and across the Morrisons roundabout. I headed into the car park to find a quiet spot to investigate.

Here we go again...

Here we go again…

I did have a spare coil with me, so I fitted that. All initially seemed well. Problem solved? At first, she seemed fine, but within a mile, a gentle misfire had crept back in. As we began the climb up the A4120, she began to miss more and more, occasionally backfiring for good measure. Backfiring? Ok. That made it feel more like condenser failure, as did the fact that it was far worse at lower engine speeds. I kept the revs up and struggled on, pausing in Pisgah to let things cool down.

She did make it back home, but conked out as soon as I pulled up. Left alone for a while, she was then fine and has been returned to the garage. Now, I’m pondering my next move. £165 on a new 123 electronic ignition unit and a resin-filled coil would probably improve things no end, but I also wonder about reviving my Velleman points-assisted ignition. I’ve got a press car coming on test next week, so there’s no rush to get Elly fixed. I am keen to get to the bottom of this quandary though. The good news is that, when not misfiring, she feels really good to drive. It is so nice to be back behind the wheel of this much-loved car. Thanks to all who made this possible. I just wish we could have a finer celebration of the fact that Elly is back! There will be opportunities this year – she’ll be at the NEC Restoration Show in March, and the Coventry Motofest in June. Fun times, they are a-coming!

Project Elly: The Finale! Sort of…

On Wednesday 4th January 2017, a major milestone was achieved. Elly the 2CV was finished! Well, close enough. It was the point that I declared her ready to face an MOT – which was duly booked, for the 6th, or today in other words.

Elly begins her third iteration. She's like Doctor Who.

Elly begins her third generation. She’s like Doctor Who.

The offside rear wing was sourced from my friend Joey, and is a proper, steel one. I will repaint it to match the front wing at some point. Honest. Also, Elly currently lacks the Dolly side stripes. I have some arty plans for those. Bear with me. All very fitting in a way, because, nine years ago, Elly’s first regeneration had been completed, and we drove her to Aberystwyth as part of the celebrations, also lacking side stripes. So, she is used to marking her rebirth on the scenic streets of Ceredigion.

15th January 2006, and a reborn Elly gets touched by a randy stranger.

15th January 2006, and a reborn Elly gets touched by a randy stranger.

Odd to think that the above photo was taken in the car park of what is now our local supermarket! Obviously, we had no idea that we’d be living here four and a half years later.

Anyway, I obviously woke up this morning full of excitement. That excitement took a battering, due to the combined efforts of the Welsh weather (very, very Welsh today, ie wet) and Elly having a battery low on charge. It hasn’t yet been charged for long enough to be entirely healthy. I’m hoping it recovers… I roped in my tiny jump back, and life was restored. To the MOT centre!

The drive there was joyous, even in the rain. Water poured down the dashboard (perhaps I should have used sealant on the vent flap) just like old times. I was glad I chose to wear waterproof boots. Crazy lean angles were acheived, and the brakes given a hard time to scrub them up ready for the brake rollers. There was the delicious smell of hot engine parts covered in greasy fingerprints. Yum. However, the MOT station was reached with no trouble.

Eep! Almost time!

Eep! Almost time!

I had to wait a bit, which did nothing to my nerves, while a Suzuki had an oil change. With that done, it was Elly’s turn. She started nicely, and I was waved onto the ramp. The tester logged her details onto the computer, checked the seats and seatbelt security, started the engine (again, first time) and checked the operation of various lamps. I was pleased that every single one behaved. As he got out to carry out further checks, she began to sound like she was bogging down. I gave the throttle a blip, which killed the engine entirely. Oh well. You don’t need the engine running to check the underside. I risked headlamps with no engine long enough to adjust the headlamps on while I had access to a beam pattern thingy machine.

Play was detected in both kingpins, which is pretty much standard fare. There’s always play, but it wasn’t alarming, so they became advisory items.

The test begins, the engine fails...

The test begins, the engine fails…

With the ramp checks complete, the lads pushed me outside where I was able to bump start the reluctant engine. It just wasn’t going to go on the key. She fired into life and was able to perform the brake tests to the required standard, but then she conked out before the emissions test. Out she was pushed again! I brought her back in, the probe went up the exhaust, a pass was achieved, and then she conked out yet again. Jeepers.

I paid, received my lovely new certificate (a joy to behold), pushed her back outside myself, bump started her myself (there’s a handy hill outside the test centre) and drove back home, slightly nervously. The air cleaner blew out on the steep hill back to my village. I could see it was going to be one of those days. I pulled over, screwed it back in and continued.

As I reached my village, I decided that maybe a full tank of fresh fuel was a good idea. So, instead of turning left towards my house, I turned right. She conked out immediately. I was starting to think that she’d become too fond of her cosy garage! This ‘driving in the rain and then being poked at’ business clearly wasn’t on.

Happily, I was pointing downhill, so I let the speed build up and attempted a bump start. She merrily trundled down the hill, in gear, with no firing at all. Ok. This was becoming an issue. Eventually, just before I ran out of gravity, she caught. Hoorah! I decided to spin the car around in a handy junction and limp home. That manoeuvre was not completed. Drat.

Elly chooses a pleasant place to stop at least.

Elly chooses a pleasant place to stop at least.

This wasn’t going to plan at all, so I called home. Rachel kindly agreed to try and find a spare coil in the messy world of my garage and bring it down to the hotel, which is about quarter of a mile from our house. She turned up at the same time as some German tourists, who were most curious. One leaned over to watch me fit the new coil. This did the trick. Ignition! We closed the bonnet, tried not to run over any tourists and drove home.

So, Elly is now sat back in the garage once more. I have a few theories about what is wrong.

  1. The ignition timing may not be spot on. I retarded it by a tooth, as I thought that’s what I’d historically had to do to avoid pinking (modern fuels burn hotter and pinking can be an issue). Thinking about it, that was the Dyane that had the pinking issue, as it has higher compression pistons and hasn’t been rejetted for modern fuels. I’m pretty sure Elly has actually. My fail. She’s too retarded.
  2. Coils. Old coils overheat and stop generating a good spark. I’ve have three coils of mixed age and condition, and I know nothing about any of them! One failed during pre-test preparations, so maybe I should actually buy a good one.
  3. Spark plugs. These weren’t changed as I didn’t think I had any. As it happens, I do! I found them last night but didn’t have time to fit them before the test.

However, having got home at last, I then had to dash out to a business meeting. That took up three hours of my afternoon, and I was shattered after a lengthy drive home in the dark and the rain (at least I was in the Honda, so my feet stayed dry). The thought of getting up tomorrow, servicing the 2CV and then driving it to Yorkshire (only to drive even further north on Sunday before then driving back home) does not fill me with joyous anticipation.

Which means I’ve abandoned my plan to take part in Raid Tan Hill, organised by 2CVGB local group Les Hiboux. It’s nine years since Elly last did this event, and I did think it’d be a nice way to celebrate her return to the road. It still would be, if I had confidence in Elly’s reliability. I don’t though, so I think I’ll stay at home, treat her to a full service (I’ve found my oil filters as well!) and perhaps have a less-pressured trip out locally instead. I can drive where I like in my 2CV now she’s road legal again! There are other ways to celebrate this wonderful achievement, so stay tuned!

A soggy, road-legal Elly awaits some much-needed fettling.

A soggy, road-legal Elly awaits some much-needed fettling.


Project 2CV: It’s coming together!

EDIT – now with video! Scroll down

I’ve really been cracking on with the 2CV, thanks to a break in workload for the most part. With the engine absent, there was still plenty to be cracking on with. Electrics for a start. I got the loom fitted, dug out the battery and basked in the glow of a full set of working rear lights. Lovely!

Christmas lights!

Christmas lights!

The fog light will be joined by a reverse light at some point, but that might fall outside the scope of getting the car road legal. Will be handy for reversing on the driveway at night though…

You’ll also note that one rear wing has been fitted. This required drilling for the 5mm set screws that hold the leading edge of the wing in place. I did not enjoy the drilling bit, and unleashed Vactan and Bilt Hamber Dynax UB to try and keep rot from gaining a foothold here. I’ve put the old, glassfibre wings back on for now. Well, glassfibre doesn’t rot does it?

Speaking of wings, the front wings have now had a final topcoat and then a coat of sealer. I’ve received replacement headlamp bowls too, so they’re now undergoing a rattle-can transformation too. Now the wings have dried, I’m really pleased with the final finish. It’s far better than I could have hoped really.

2CV wing

Rattle cans have worked surprisingly well!

Not that everything has been going well. Refitting this brake bracket has proved a nightmare. It supports the brake master cylinder, and also the pedal box. Sadly, the profile doesn’t quite match the aftermarket bulkhead panels, so getting it to bolt down is proving tricky. I’ve opened up the holes a little, as it really isn’t far from fitting, just not close enough!

Annoyingly, this brake bracket won't fit. I hope to defeat it with cunning.

Annoyingly, this brake bracket won’t fit. I hope to defeat it with cunning.

Meanwhile, I’ve finally got the engine back! It proved an ideal way to test a Nissan Qashqai (full review coming soon), with the engine sitting very nicely in the boot, strapped down via the handy lashing points.

The engine on its return journey, aboard a Nissan Qashqai.

The engine on its return journey, aboard a Nissan Qashqai.

After a slight panic, when I realised I didn’t have any flywheel bolts, I managed to order some from ECAS 2CV Parts, just catching them before they finished for Christmas. Annoyingly, I’d been at ECAS buying more bits just the previous day. Oh well! They were able to sling them in an envelope with a speedo cable, that had been out of stock when I was there – another essential ingredient as the old one has fallen to pieces.

That allowed me to refit the flywheel, fit a brand new clutch and, after a second go at aligning the clutch, slot the engine home with the assistance of Rachel (she’s helped me do a few engine swaps now. She’s really quite good at it).

Then I had to refit the fuel system, connect up the engine electrics and I was ready to get the engine running! Only, it wouldn’t run. Pulling a spark plug revealed a lack of spark, so I spent a frustrating afternoon chasing the electricity. I checked and double-checked the wiring to my Vellerman transistorised ignition, even remaking a section of wiring in case that was at fault. I could see that the points were opening, but still no spark. I gave in and pulled the cooling fan off to access the points box. The gap was tight, so I opened it up, but still no spark. Ok. Maybe the Vellerman kit was at fault. Easy to check – I disconnected it and grabbed a spare points box (that handily had a condenser already connected up to it – you don’t use one with the Vellerman kit).

Now my spark plug was sparking away very merrily indeed! Time to make some noise.

I was very pleased with that. Sure, she was spluttering a bit, but then engines do like back pressure. And accurate ignition timing (I’d pretty much guessed). And the correct mixture. And fuel that isn’t months old…

Really coming together now!

Really coming together now!

Which brings us pretty much up to date. I’m still hoping to get her to an MOT station next week (I’ve found one open Wednesday to Friday), but there’s still quite a bit to do. The doors still need building up and fitting, as do the front wings and headlamp bar. Oh, and the bonnet. And the rest of the exhaust system. And the brake master cylinder (which means that sodding bracket, then bleeding the system). Oh, and I need to change most of the wheels. And fit shock absorbers. And the other rear wing. Still plenty to do then! Still, it’s an awful lot less than there was to do. Lovely.