Dyane: All is not well.

When you buy a seriously cheap Dyane, that was parked up on a farm for many years, you can expect one or two problems. That’s fine. I didn’t pay ‘perfect’ money. In fact, I barely paid any money in Dyane terms. I have no quibbles. But, I do have quite the To Do list.

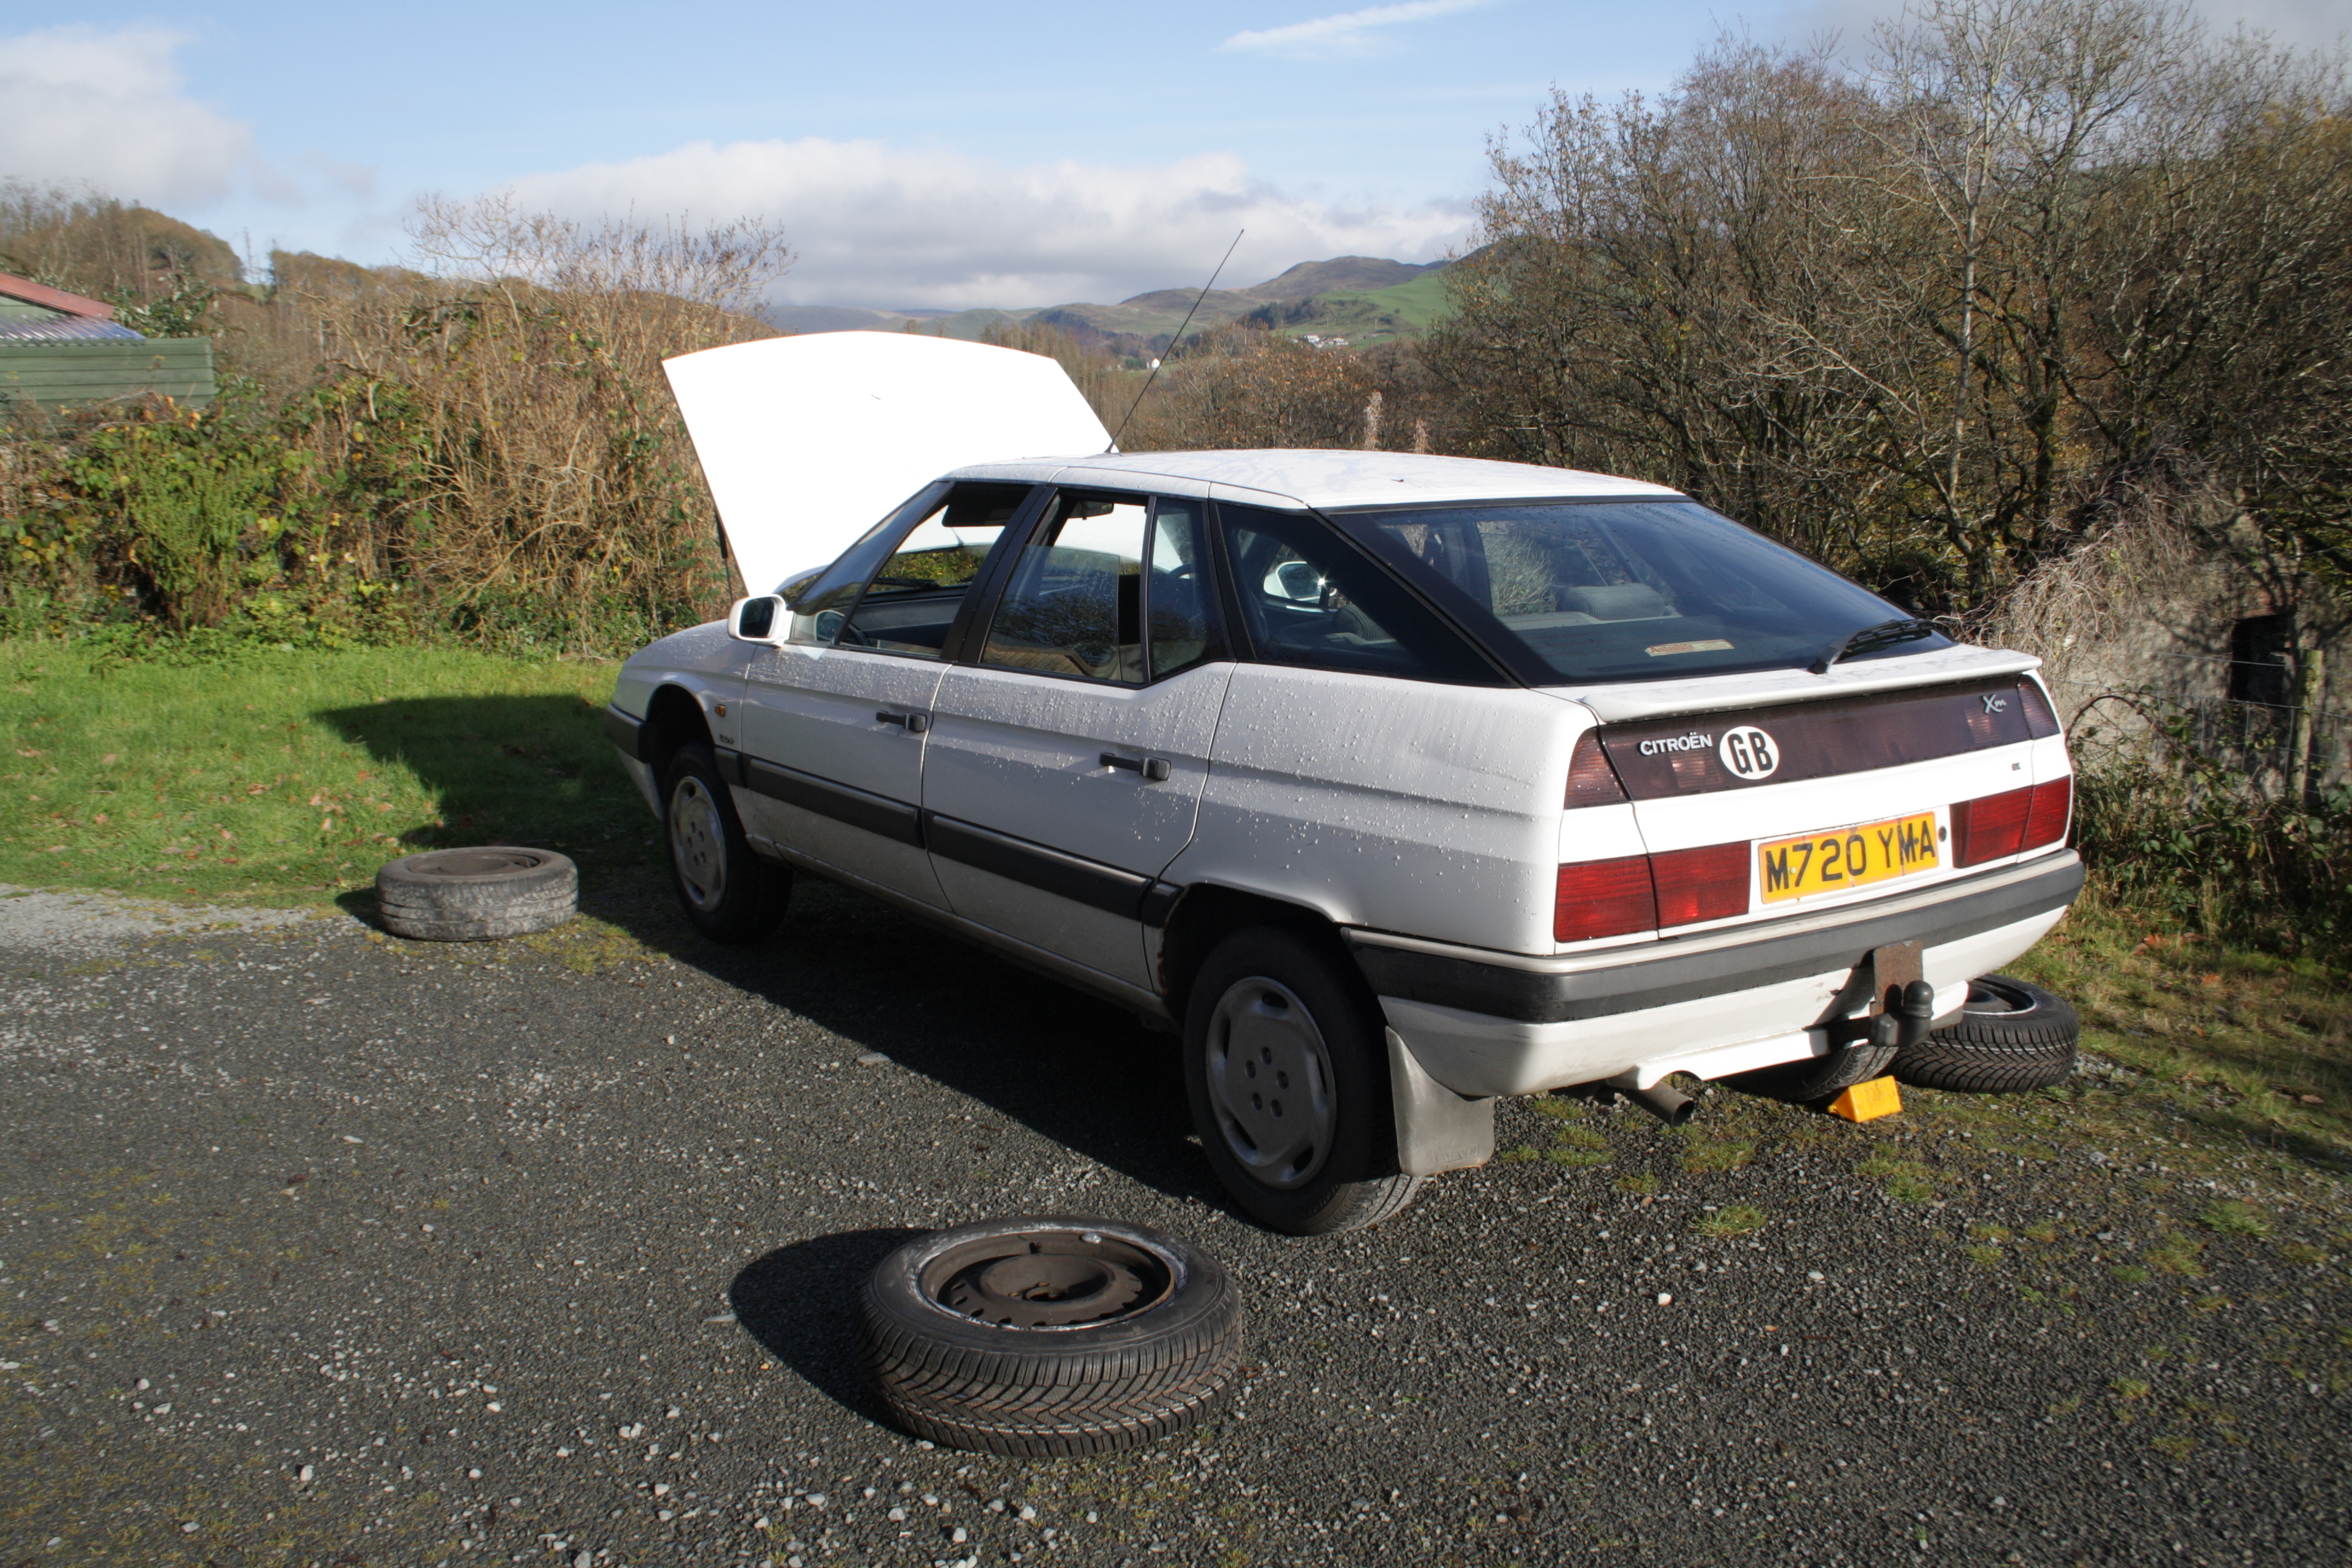
I removed the sleeping Perodua from the garage and into the rain this morning, and inserted the Dyane. I let it dry off while I consumed breakfast. Then I gave the engine bay a proper look-over. The sort of look-over I should have done before driving it 172 miles really. Oh well.

Talking over an odd noise it was making under light throttle left someone suggesting I should check the intake side of things. It didn’t take long to find a problem!

2CV Dyane intake manifold leak

Oooh! That isn’t helping. The bolt has gone completely.

A missing bolt. The other one this side was finger tight. Naturally, the thing to do here would be to insert another bolt. The cylinder heads are aluminium, and it’s terrifyingly easy to strip the threads. Is that what had happened here? I couldn’t get a new bolt to start, so decided the best course of action would be to remove the manifold and see what’s what.

After dismantling the exhaust system and removing the alternator, things looked like this.

Engine bay

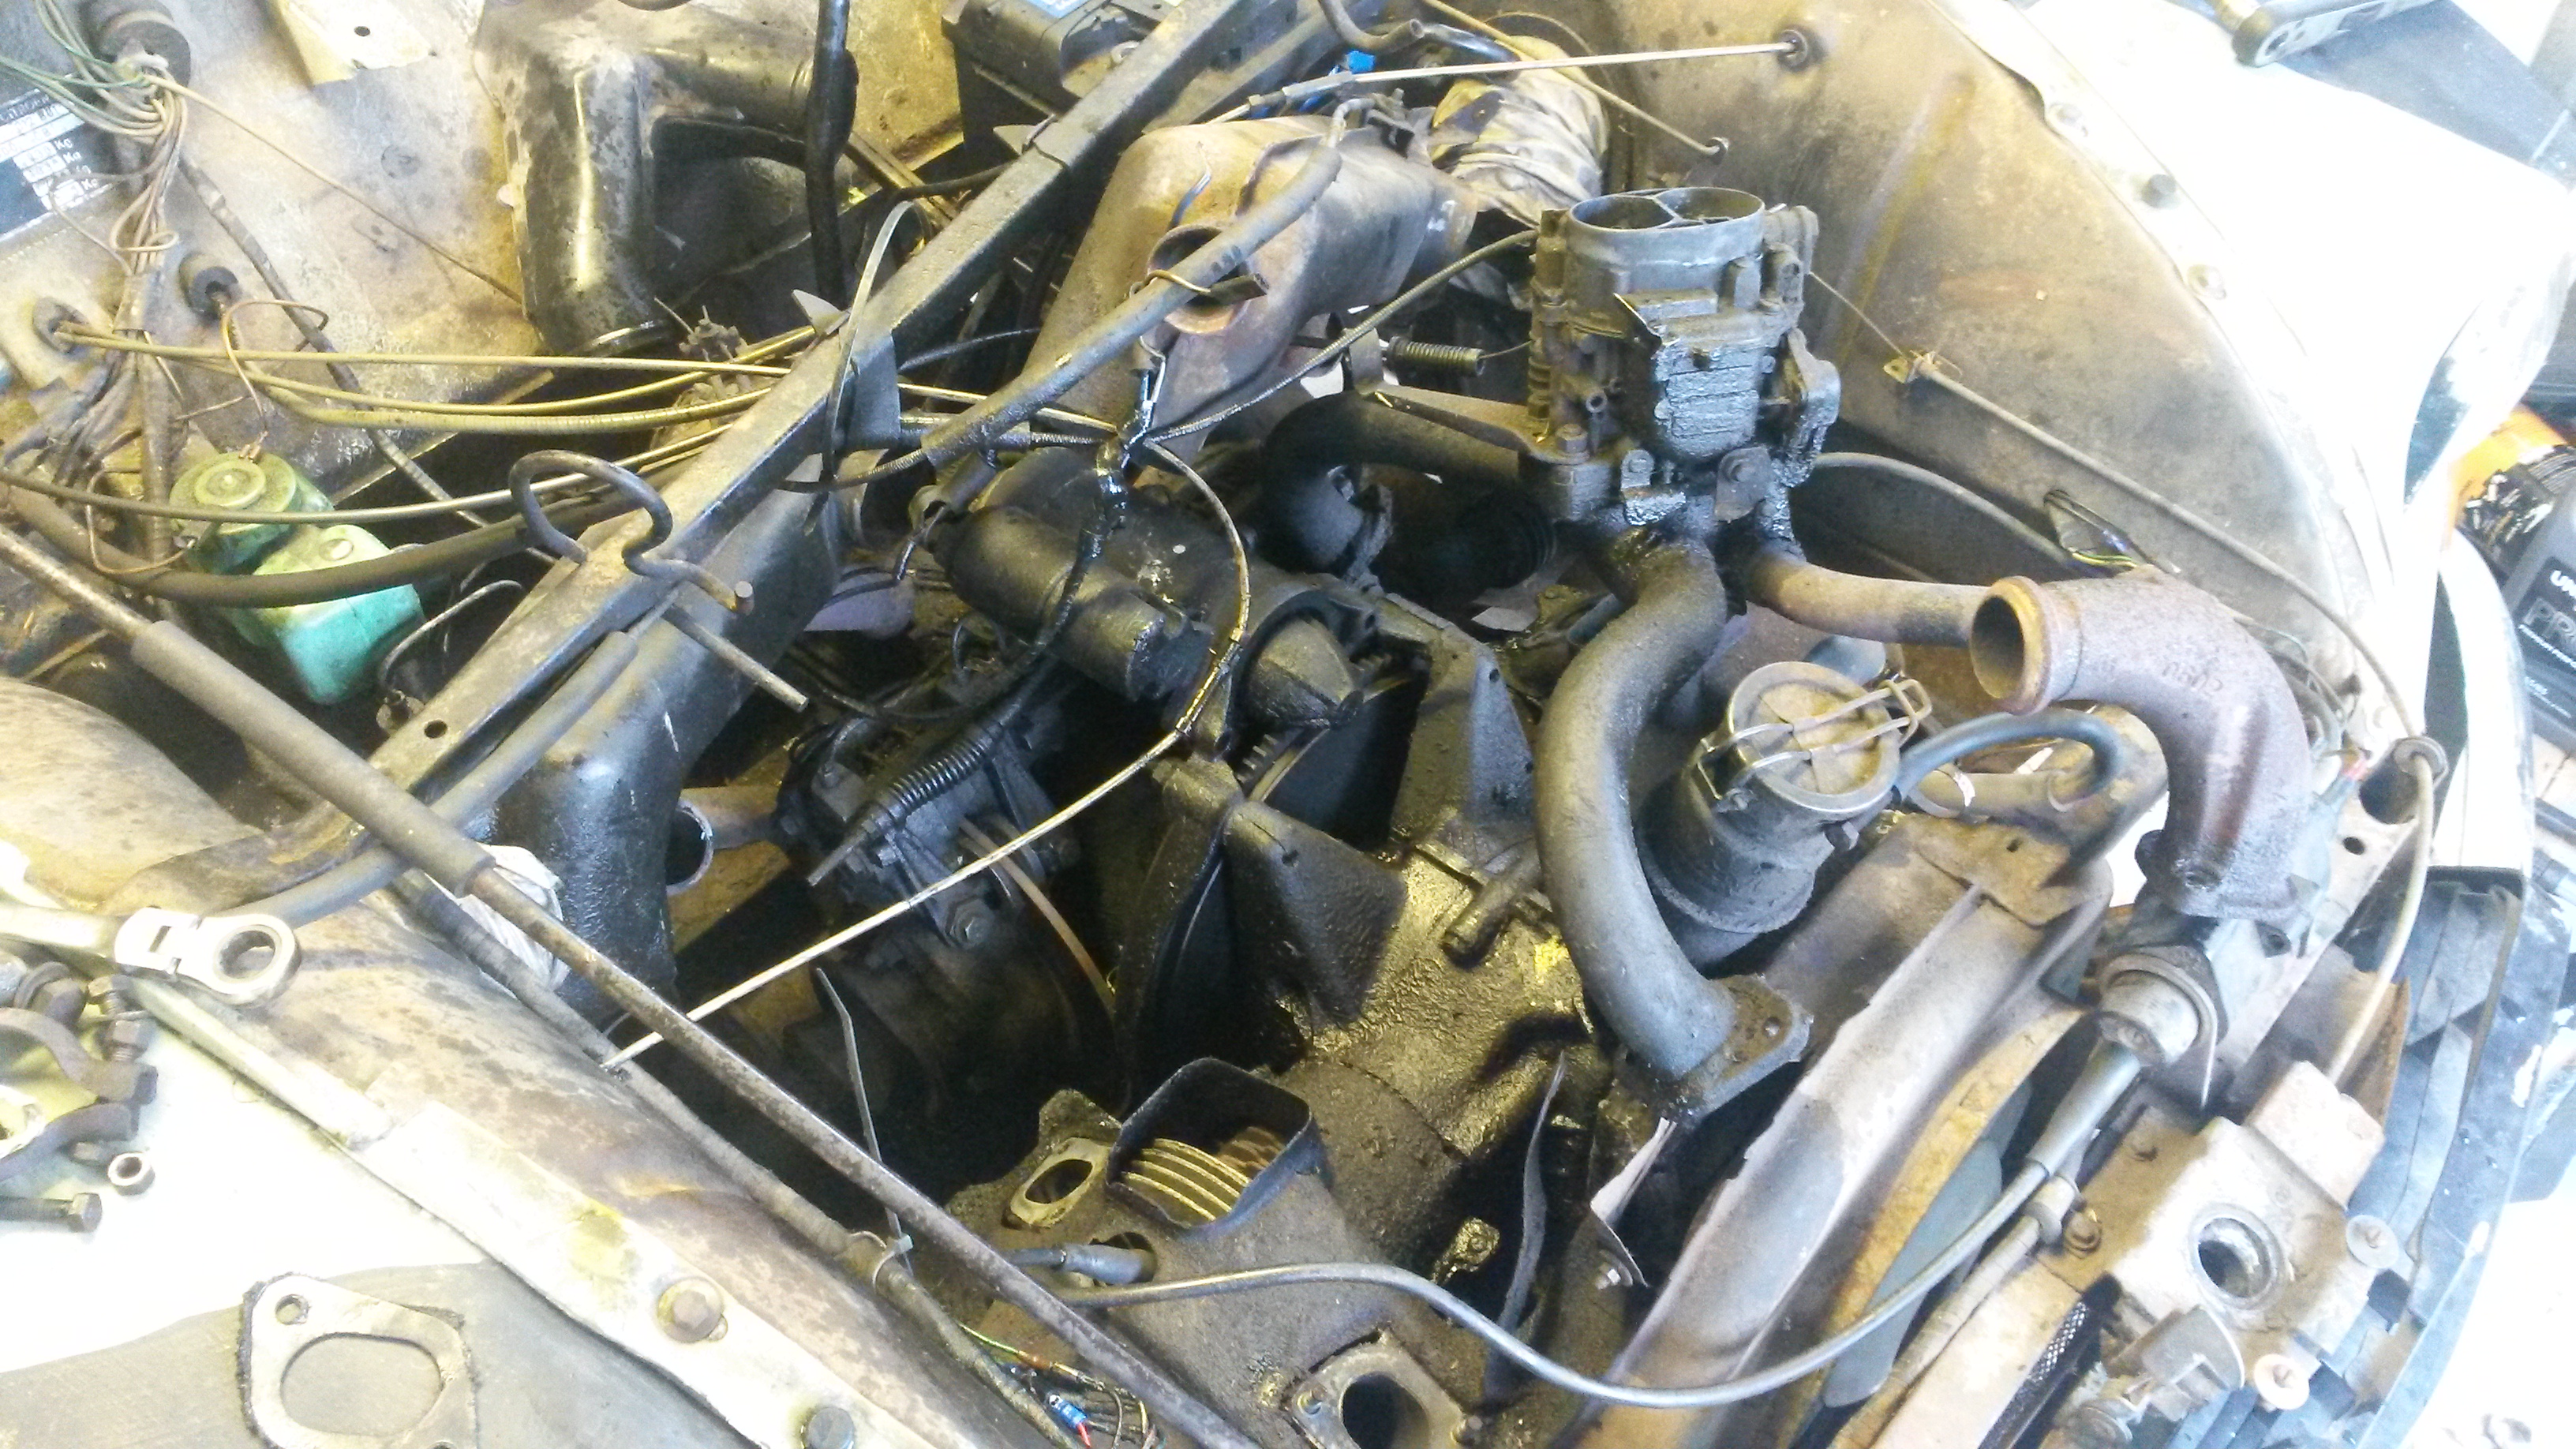
Under this soup of misplaced parts is an engine.

As it happens, this was all a bit unnecessary. I ran a bolt into the thread with the manifold removed, and it seemed to go in nicely. Only one thing for it – put it all back and bolt it down. Success! All the bolts torqued up (the setting is very low) nicely. I didn’t have quite so much luck reconnecting the exhaust system though – new clamps may help there as the old ones are a bit tired. It’s always a fiddly faff. I shall try again when freshly enthused. I did check the valve clearances though, and opened up the inlets to the recommended 0.25mm. The exhausts were already at the ideal 0.30mm.

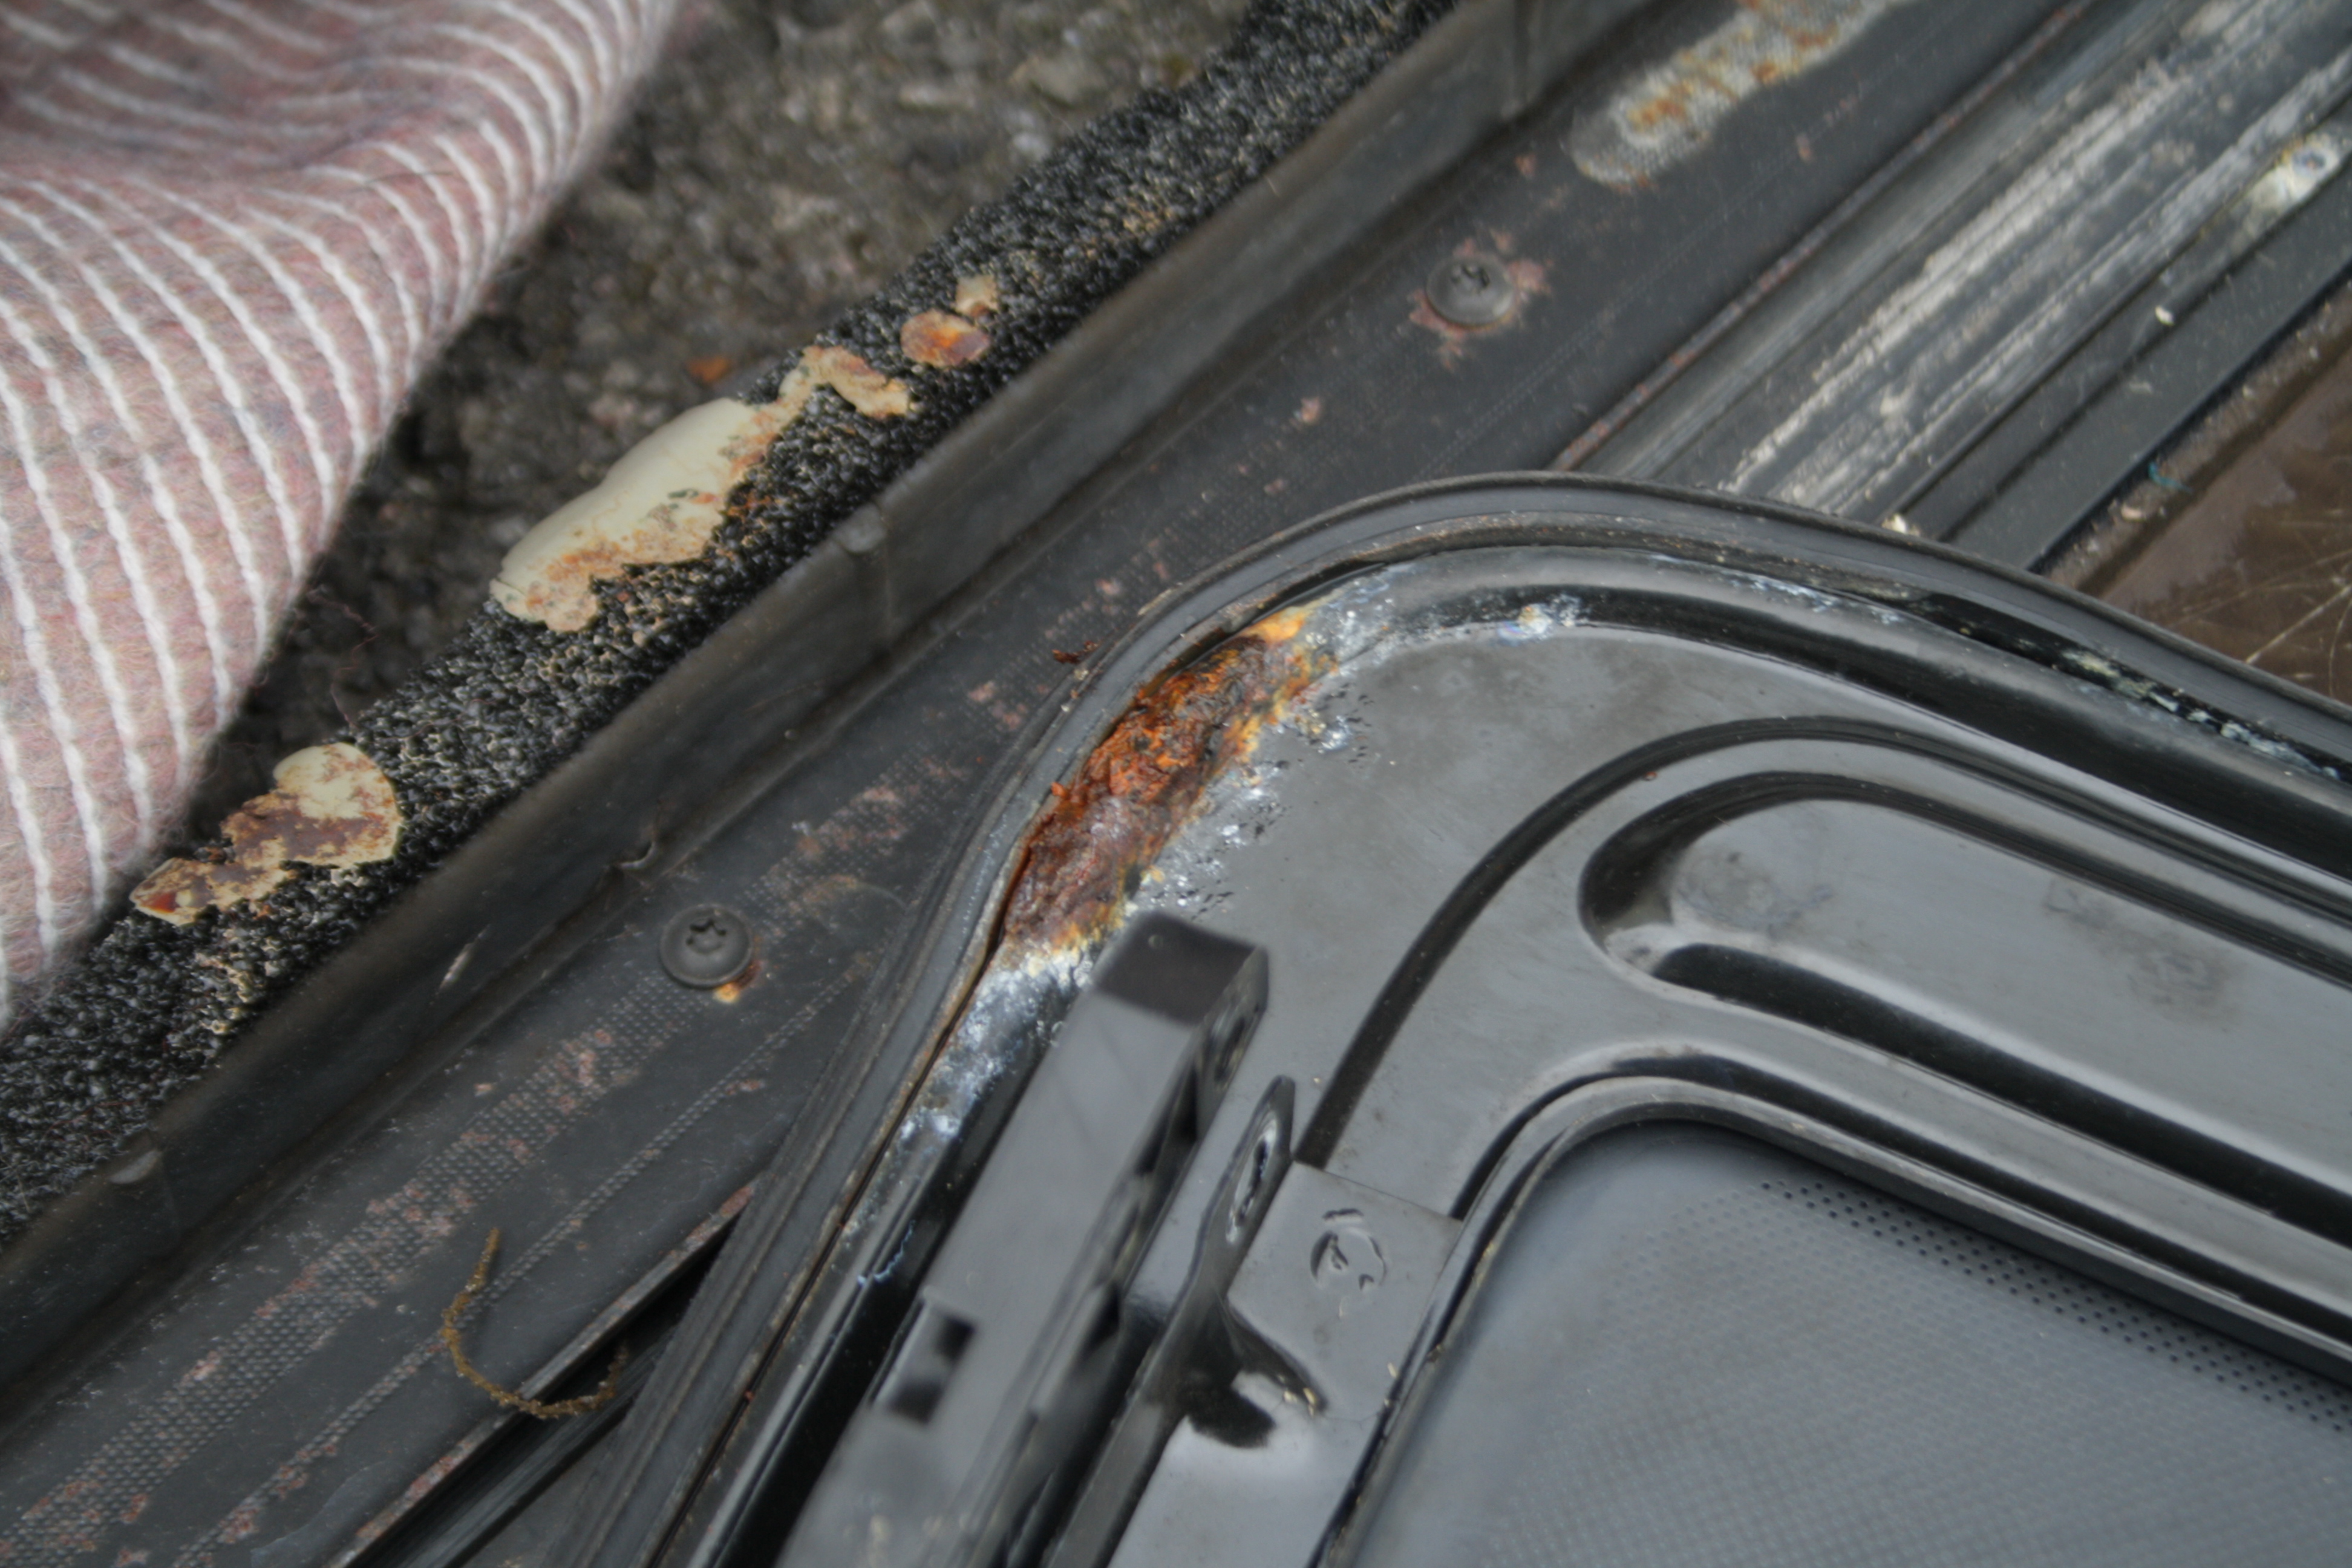
Problem Two was pinking. Now, the inlet leak could have been responsible, but I suspected that the ignition timing was off. No problem. Quickly get the fan off to check the state of the points and the gap, then time it up. Only the fan didn’t want to come off. I was forced to faff about removing the front panel to gain better access. Eventually, after much clouting of my drift, the fan came off its taper.

Naked Dyane

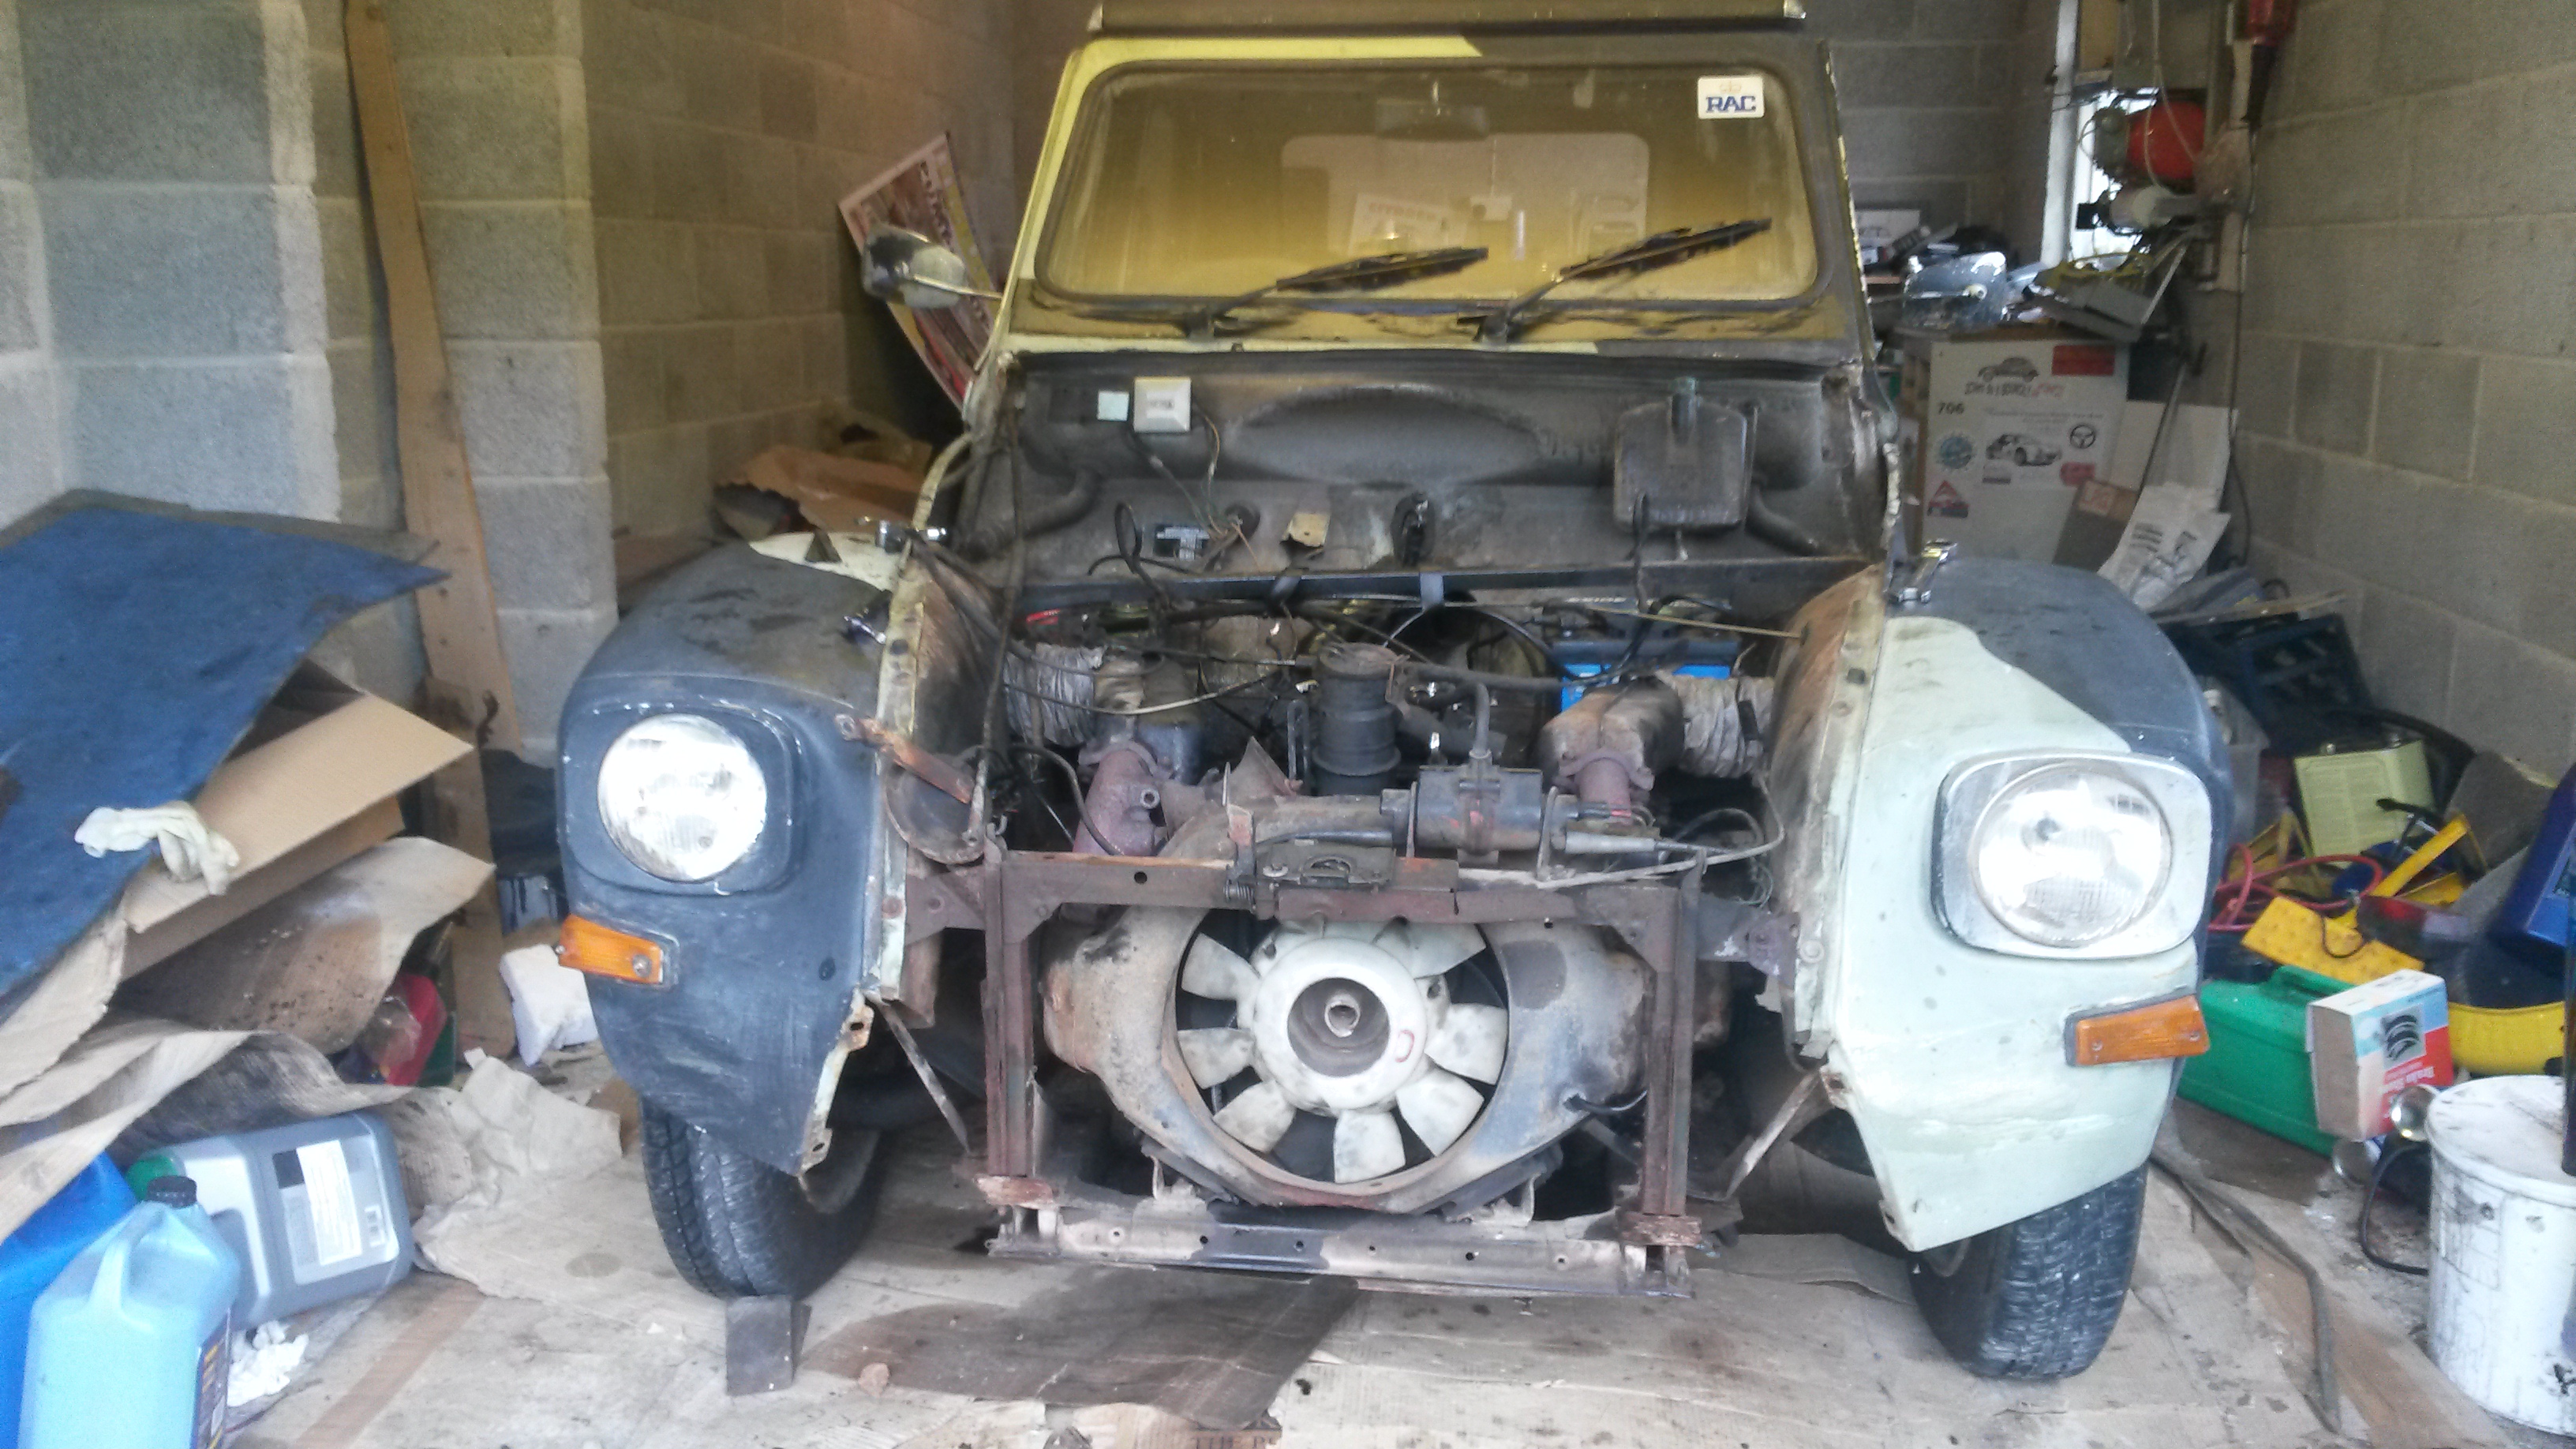
Rusty bolts hindered front panel removal.

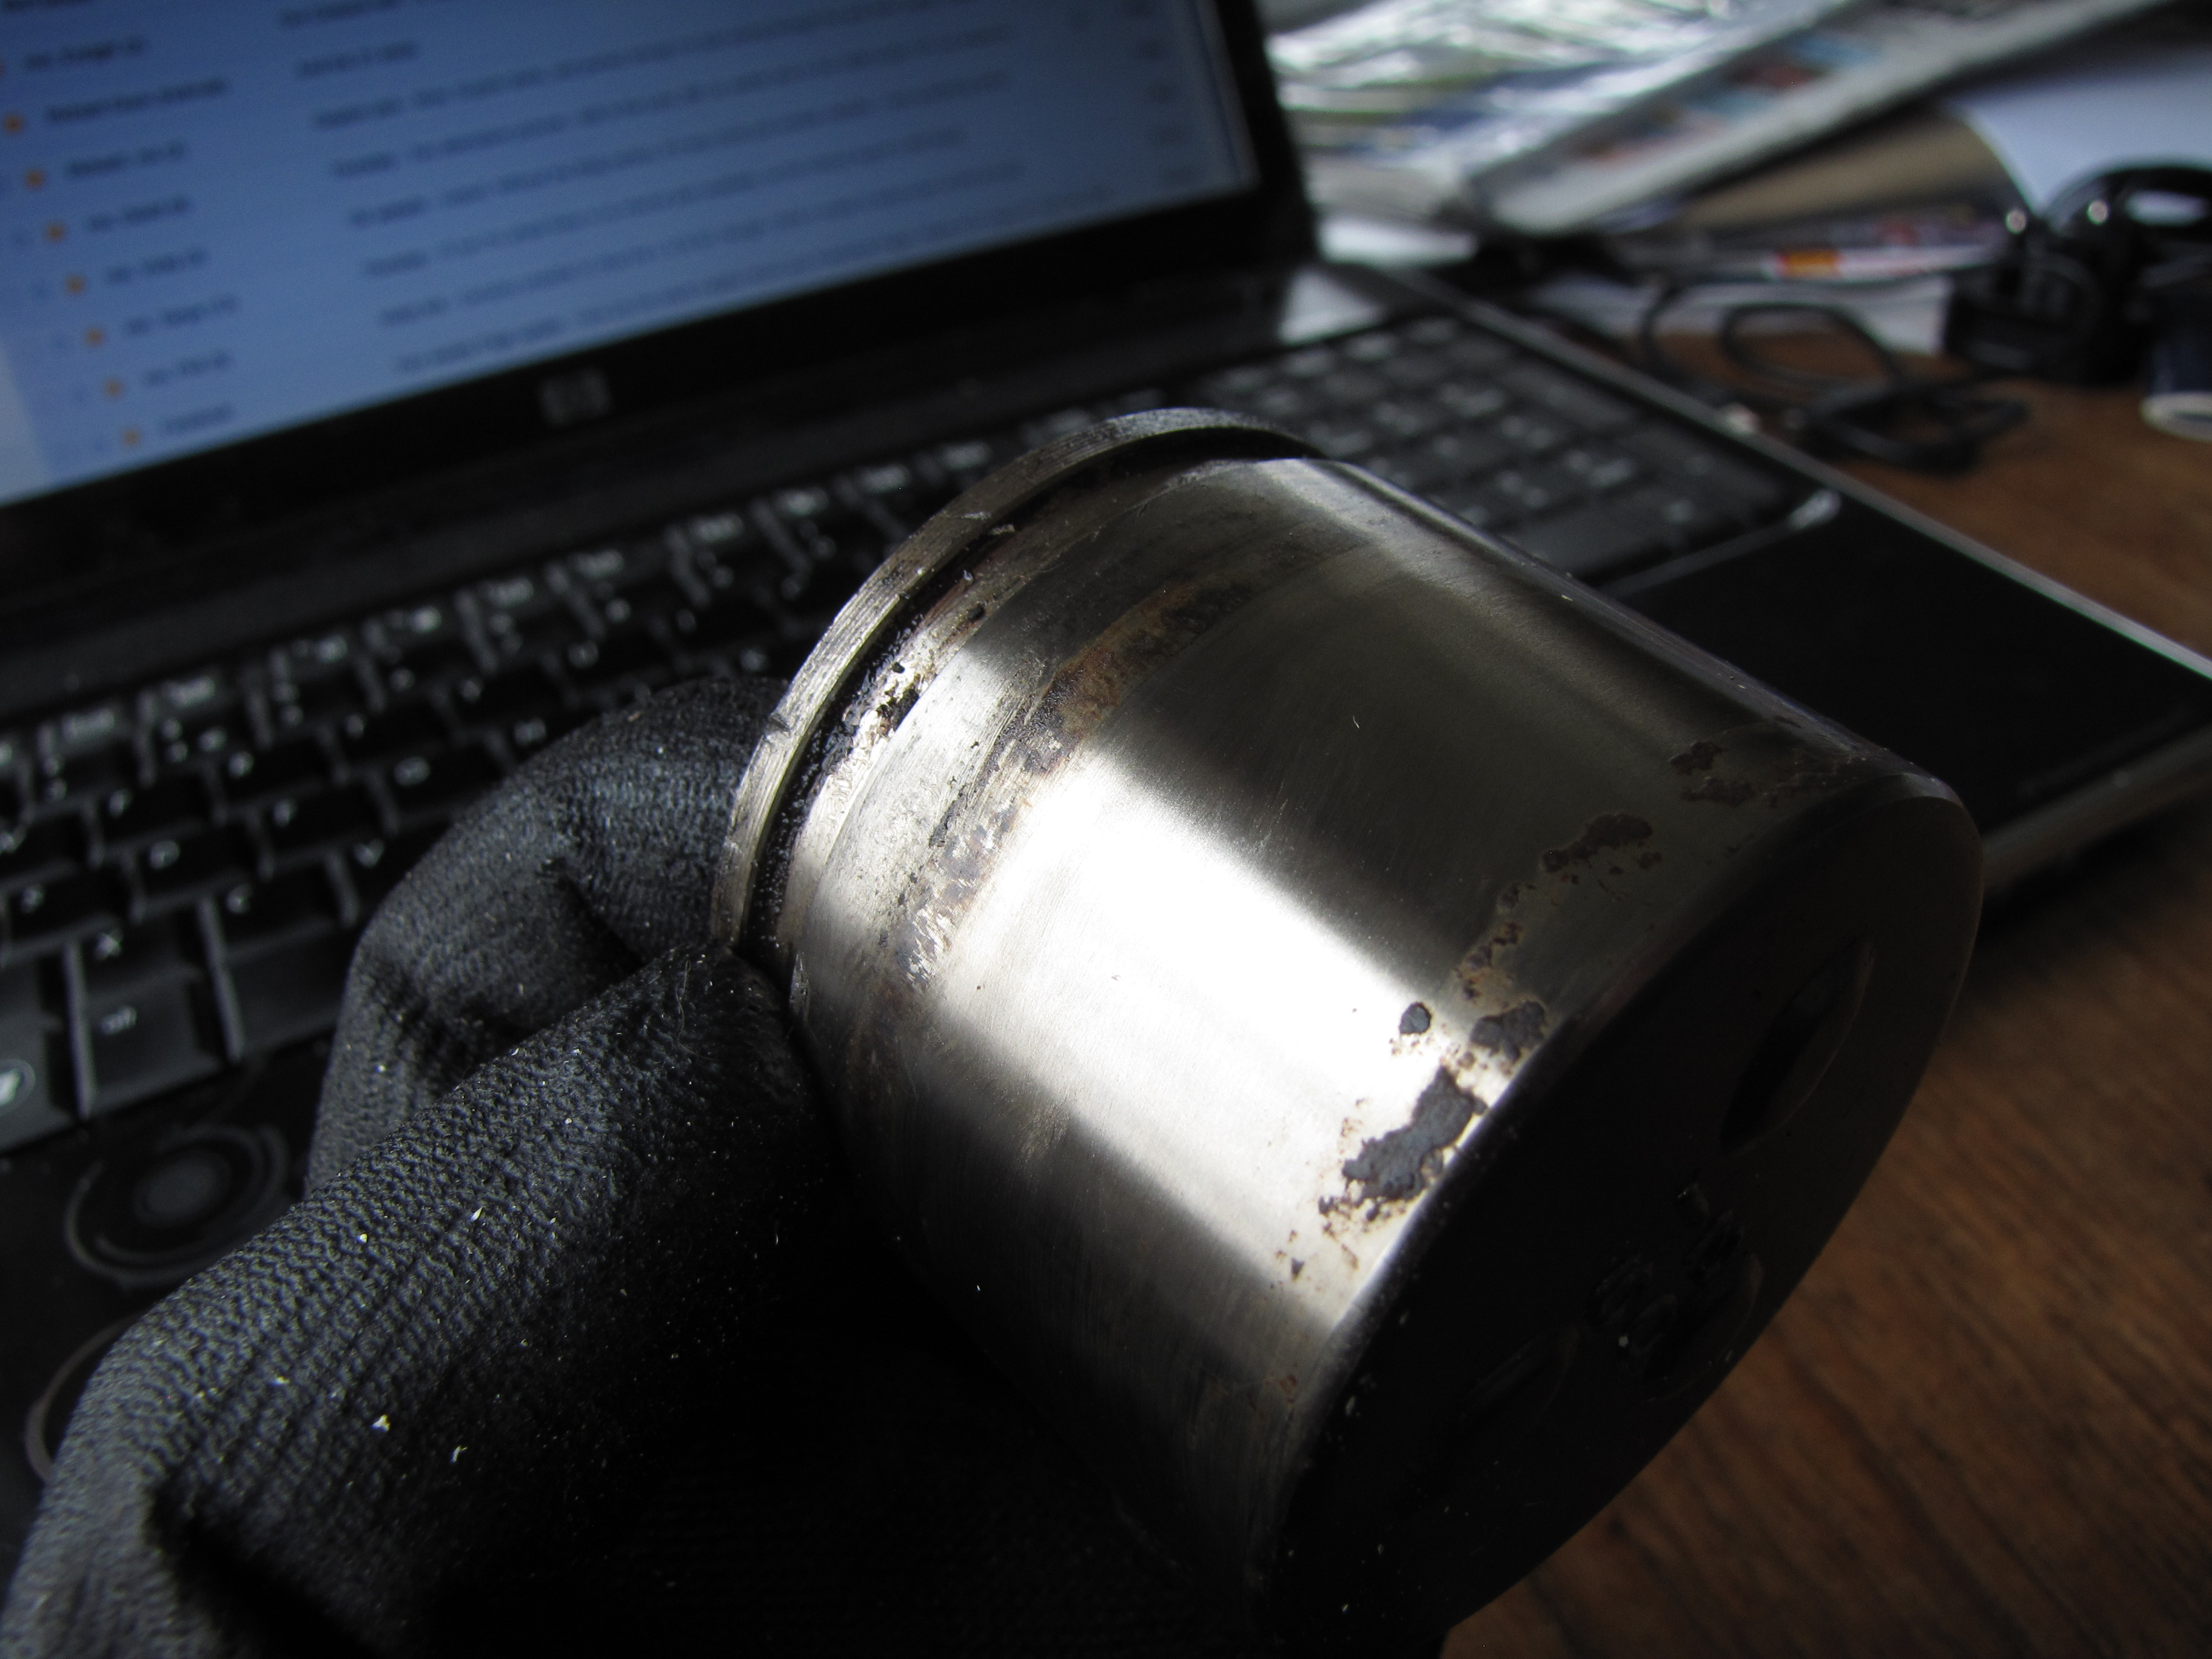
Once the fan was off, I was horrified to discover some serious impediments to the cooling system. It looked like a plastic bag had got sucked in at some point, with remnants seriously hampering air flow over the cooling fins of the nearside cylinder head. Worse, some bits were blocking the oil cooler. Worse still, behind that, the oil cooler looked like this!

EEK! That's seriously mucky.

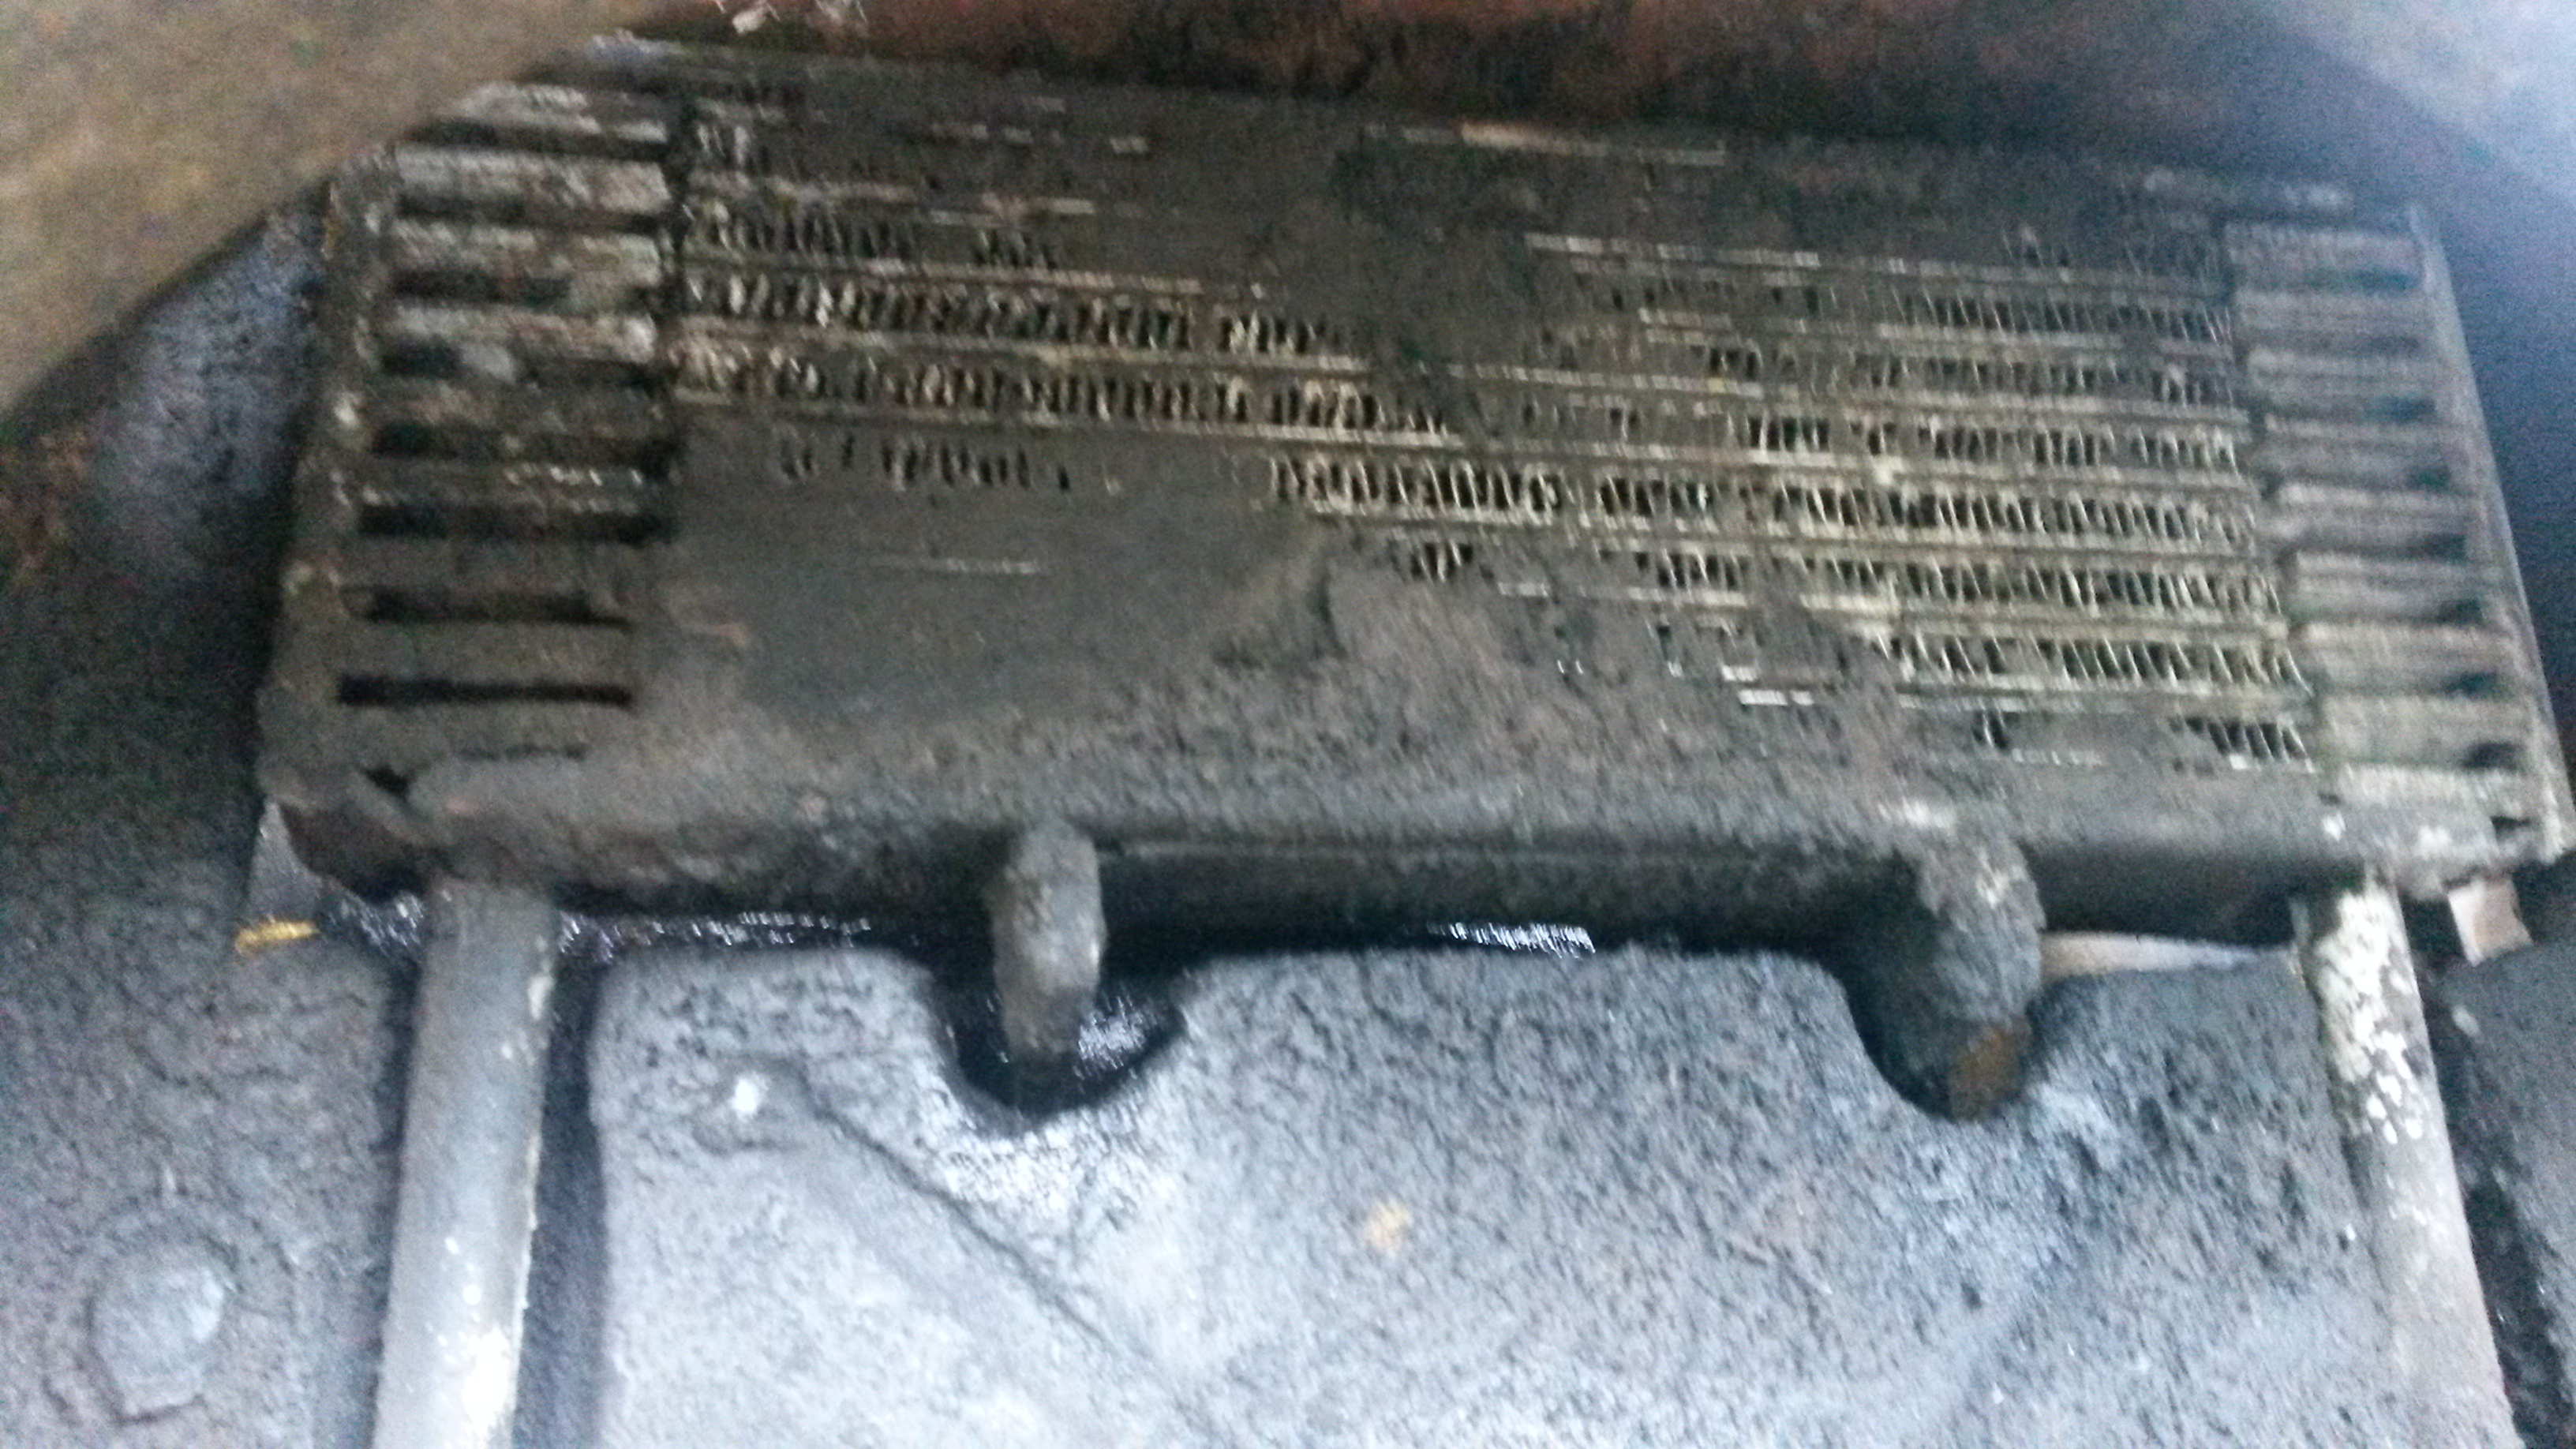
EEK! That’s seriously mucky.

That’s not good at all. Aircooled engines tend to rely on the oil itself being cooled. I was starting to wonder just how this poor little car had got me home. A major intake leak and much-hampered cooling. The best way to clean the fragile cooler is by using compressed air, blowing from the engine side. I had no compressed air, so went for a different strategy. Gently brushing degreaser over all the muck, then squirting water through from behind with a hose. Very, very messy, but it did the job and I only mildly soaked myself.

The second part of this was to refit the fan and start the engine. That really did blow the muck out! In fact, given how much water I’d pushed down towards the points box, I was amazed that it ran at all. When I opened up the points box, it actually had quite a bit of water in it…

The ignition timing was way out – several teeth too advanced. Again, how it got me home without holing a piston I don’t know, but clearly I had successfully driven around the issue, as described last time. You should never just let an engine pink. It will end badly (modern cars have knock sensors to avoid this happening).

I created a new timing mark, though I need to revisit the setting next time I’m tinkering. With unleaded fuel creating a hotter burn, the experts reckon it’s wise to retard the ignition timing by one tooth. That’s ok as I ran out of time today and simply downed tools once I’d reset the timing.

Engine-wise, I also still need to see why the idle is lumpy and unsettled. The spark plugs are new, so it shouldn’t be them. It could be the mixture perhaps, as it seems to idle nicely when on choke. I did try unblocking the carburettor jets with the ‘hand on top of carb at revs’ trick but it didn’t make a difference. As they traditionally say at such times, TO BE CONTINUED.

XM and Dyane news

Yesterday, I drove over 300 miles to Wiltshire and back. The XM shrugged off this trek, as it so often does and even though the boot was full of wheels, tyres and bits of Dyane.

Our plan was to get the Dyane in something approaching a decent enough state to pass an MOT. This we largely achieved, though I had to leave before things had been concluded.

The Dyane, not yet quite ready for an MOT.

The Dyane, not yet quite ready for an MOT.

The indicators were particularly annoying as aside from a couple of small bulbs needing replacement, the lighting was otherwise fine. The indicator units are a bit rubbish though, so we had to raid a parts stash to find decent replacements – and invoke a little bodgery to gain the desirable flashing.

Wheels and tyres from my 2CV were fitted, as the tyres on the car were horribly perished. A couple of driveshaft gaiters were replaced, the brake system completed and bled and I could actually have my first drive of my new car. Woo-hoo! The engine sounds beautiful, so it has been treated to some fresh oil and a new filter. We even chucked in a pair of new plugs. I reckon the valve clearances are probably a touch tight, but it’s running well now, so I’ll leave well alone.

After five hours, we’d achieved a lot – including loads of small jobs like fitting door check straps, replacing the fuel line and finding a way to secure the bonnet due to the hinge rotting away. I set off back home while the lads kept working, and they reckon she’s good to go! Hopefully the MOT man will agree on Thursday.

Huzzah! Will she pass an MOT?

Huzzah! Will she pass an MOT? Ignore the date stamp. Not my picture!

On the way home, the XM’s fidgety ride was starting to bother me quite a bit. Thankfully, I’d already ordered some rear spheres and a sphere tool, and they arrived while I was Dyane fettling. Today, I set about changing them.

The two main suspension spheres were a piece of cake. Suspension on high setting, crack each sphere off with the tool (gently assisted with a hammer) just to get them moving, then suspension on low, open the pressure regulator and remove the spheres by hand. Then I inserted the new seals, twisted on the new ones (like an oil filter, and hand tight is fine) and that part of the job was done.

Yuck! This is the state of one of the old suspension spheres. Mucky.

Yuck! This is the state of one of the old suspension spheres. Mucky.

Sadly, the centre sphere had other ideas. The spheres had valves on them, which suggests someone had the bright idea of fitting spheres that could be regassed. Sadly, this means they’d been sat there for an awfully long time! No matter what I tried, I could not get the centre sphere to shift. This is the key to the XM’s remarkable suspension. The centre sphere is used so three spheres give that wonderful, wafty feel as you drive along. Start hooning and the electronics lock out this centre sphere, which firms up the suspension. It’s what gives the XM such marvellous poise.

But there was no chance it was going to come undone, so I had to give up. Not even a chisel would shift it. I’ll have to let a specialist give it a whack at some point. Pleasingly though, the ride is already much improved. It was very bouncy and firm at the back, but it has now regained that magical Citroen float – even if it is still much firmer than a CX or DS. I’m well pleased.

My fleet: A cunning 2CV MOT plan is hatched

I got woken this morning by the workmen on the narrow gauge railway, performing hedge-trimming activities at the ludicrous hour of eight o’clock in the morning. Perhaps this is why I stumbled into the land of the living with the hair-brained scheme of getting my 2CV MOT tested. I reasoned that after all, I didn’t know for sure what Elly the 2CV would have failed on had I put her in for an MOT back in April, before her MOT expired.

Headlamp woes afflict final push for 200,000 miles.

Look at her poor little face! Maybe I should park her the other way around.

Conveniently, I do some occasional work for a community bus scheme in the next village, located in the same premises as an MOT garage. I had bold plans to book an MOT and take Elly down for a fact-finding mission. After a cup of tea and rather more functioning of the little grey cells, I decided it made more sense to drive my XM to the garage and have a word with the MOT testers instead.

So, that’s what I did. Sorted a few things in the office, then sought out the testers for a few pointers. The key corrosion restriction is that there must be no serious rot within 30 centimetres of a body mount (where bolted to the chassis), seatbelt mount or mountings for the seat themselves. I know Elly has a fair bit of rot around the rear seat box. I reasoned I could merely remove the rear seats and associated belts (I can live without a rear seat) and that’d be that.

I returned home full of enthusiasm. I grabbed a tape measure and headed for my garage. Prodding around the seat box area, I realised things were more solid than expected. Brilliant! Then I crawled underneath and prodded around a bit. Oh.

Things were very crumbly indeed. Worse still, this rather serious rot was far closer to body mountings and front seat belt mounts than 30cm. Removing the rear seat was a hideous bodge I could cope with. I can’t really remove the front seats. Bumhats and, indeed, arse.

Now, I’m not foolish enough to have considered that I was on a hiding to an MOT pass without doing any work at all. For a start, I’ve just remembered that I pinched one of the headlamp relays for the XM and naturally, the fog light doesn’t work. But I did also have enough realism floating around my veins to know that welding was definitely going to be needed. It’s a question of how much. This is starting to feel like trying to dry out a used teabag so you can use it again. Thinking about it, a tea bag probably has more structural strength. And is probably better at keeping water out…

Common sense would suggest that I just strip the car down so further driving desires are entirely out of reach. Having the car sitting there, willing to go, is slowly driving me mad I think. I had to distract myself for a week with an electric Golf for heaven’s sake. Though that backfired as I had to enter the garage every day to charge it.

Others would suggest that I should weld it up myself, so as I’m fed up of repeating my feeble excuses for not doing that, I shall not do it again. Ok. I will. But only briefly. Suffice it to say that I’m too hirsute, too impatient and too easily distract-ooooh look! Cats on the internet!

So, for now, it’s back to the boring world of saving money up so that I actually can get this car rot free. Expect my next frustrated meltdown in about a month’s time. I apologise for whining like a teenager.

Citroën XM: Sunroof woes

Since I bought the XM, and presumably long before, it has had a sunroof leak. I checked the drains weren’t clogged – they weren’t – and then noticed that the water appeared to be coming through the glass! How was that possible?!

rotten frame

This little bit of rot causes BIG issues

Turns out that the frame the glass is bonded too often corrodes on XMs. This both breaks the bonding between the glass/metal, and pushes out the main seal. Now that seal isn’t designed to stop water coming through the hole – that’s why there are drains – but it IS meant to stop water coming through the glass. When it starts bulging up, water gets in and then passes through where the bonding has failed. This is what’s known as a pain in the arse.

I tried taping over the sunroof but capillary action allowed water to seep in regardless – and the tape then prevented the seal from ever drying out. So, I was forced to seek a replacement glass/frame. I removed the sodden headlining so it could dry out, and I could also reattach the cloth that had started to sag after the moisture washed away the glue. The plan was then to replace the entire mechanism.

Note. Before replacing an entire sunroof mechanism, make sure the new mechanism works! We learnt this because the one we fitted was badly seized. Plan B. Back out with the new mechanism (which is very heavy!) and swap the glass/frame over. Me and a friend did this while having no clue how sunroof mechanisms work. Eventually, we got it all working, tested and back in the car.

Fresh air motoring! Quite a big hole

Fresh air motoring! Quite a big hole

As it happens, I immediately drove the XM to a Citroen specialist for timing belt renewal, so it’ll be sometime until I can tell whether this refit has been successful. Certainly it’s true that the new frame is in much better condition! I should have the car back next weekend. Place bets now for how long it’ll take me to get around to refitting the headlining…

I am still liking this car though. It’s not too joyous around town, due to the heavy clutch and tired spheres, but it just lopes along on fast country roads so well. That’s why I own this car. So, spheres are next on the hit list, and I may have to do something about the clutch too. They can last a long time in XUD diesels, so it may even be the original. Tight budget prevents me from getting too much done in one go, but I am steadily improving this car! It astonishes me how much more I like it than the BX, of which I’ve long been a fan.

Citroen XM – oooh, rust!

The Citroen XM has a pretty good rust reputation. That means it gets really quite rusty after 20 years rather than 10. Mine is almost 20. I bought it knowing it’d need some tickling with a welder but here’s the thing I stupidly still haven’t learnt. If you spot a bit of rust on inspection, you’ll find a lot more once you start prodding!

The rear of the offside sill I knew about when I bought the car, as I put my finger through it. The rot around the offside strut top I discovered when fitting new tyres. Just as picking at a bit of wallpaper in your lounge can suddenly turn into a complete redecorating job, so it follows that picking at a bit of loose underseal will result in a major welding session.

Floor rot

Yikes! Cleaning the underseal off reveals issues.

As Pete of Sparrow Automotive desperately tried to weld up the XM, I was rushing ahead to clean up the sections that we’d found to be a bit soft. The XM is very well protected by underseal – thick rubbery stuff that does a very good job of keeping it solid. The problem comes if that gets breached. Then, water soaks in behind it and rots out the metal completely out of sight. Any flaky underseal I saw got removed and thankfully, most of it hid only solid metal. That was certainly the case in the nearside front wheelarch, where all I found was surface rust. I’d acted just in time. I should thank Pete really though – he thought it’d be a good idea to strip the wheelarch liner out on the nearside and have a look. After all, the nearside is usually worse than the offside. Not on this car!

Surprisingly solid! Cleaned up, primed and undersealed

Surprisingly solid! Cleaned up, primed and undersealed

It was apparently that I’d caught quite a lot of rot just in the nick of time. How brilliant it was to be doing this job with a two-post lift though! Some of the repairs were properly tricky, with Pete having to form carefully shaped repair pieces. It’s amazing what a time-thief this sort of work is. Even when the welding was completed, we then had to wait for the zinc primer to dry before being able to underseal the repaired and cleaned sections.

That's better! Welded, seam-sealed, primed and undersealed

That’s better! Welded, seam-sealed, primed and undersealed

While Pete went off for a well deserved dinner, I slopped Waxoyl over any other vulnerable looking bits – like the front subframe and rear suspension. The underseal took ages to dry, but we were then finally able to refit plastic trim and ducts – as visible above – for the hydraulic pipes. They were also treated to a coat of grease while we were at it.

Somehow, this all managed to take 11 hours! It was a long day, and then I had to drive another 1hr 45 minutes to get home. I slept soundly last night!

I’m glad to have got this work done though. I like the XM very much, so I can now use it through the winter with a lot more confidence. There are still jobs to do though – the sills still need stonechipping and then painting. We never did find time to change the strut top either – necessary as the rubber has delaminated quite badly. Again, on the offside.

A tough day, but a day well spent. Many thanks to Sparrow Automotive.

Still amazed by winter tyres

Two years ago, I boldly sold my 4×4 as winter approached, even though I live in the hills of rural Wales. The reason? I was putting my faith in winter tyres. People still ask me: “Are winter tyres any good?” That winter, I discovered the answer.

Tellingly, I had to help rescue my old 4×4 because it had got stuck in snow that was drifting up to 4ft in places. This is the thing – if the snow is really bad, folk around here either jump in a tractor, or simply stay at home until the roads are cleared. I didn’t use my car for that rescue. There are limits, even with winter tyres!

What really impressed me that winter though, was the very-real benefits winter tyres provided. That was a set of Riken Snowtime tyres purchased part-worn from a friend. They’d barely been used in reality. I fitted them to my Citroen BX turbo diesel. Now, it must be said, winter tyres are not truly magical. Floor the throttle, and the car will still lose grip in snowy conditions. Similarly, if you go flying into a bend, rubber can’t save you if there’s a lot of snow on the ground. You have to respect the conditions.

However, what REALLY impresses with winter tyres is stopping power. Summer tyres really struggle in low temperatures. The compound becomes too hard, so the tyre struggles to get any grip. That means you’ll either lock the wheels or the ABS will cut in. Either way, your stopping distances will be vastly increased compared to clear tarmac.

With winter tyres, I was finding that I could stop nearly as well as on a dry road! The difference was simply staggering. Sure, sheet ice was still an issue – only studded tyres will find grip there – but even on compacted snow, the car felt planted unless you were really silly with it. At one point, I parked on a slope, got out of my car, and almost fell over! I hadn’t realised how slippy the road surface was.

So, given a chance to put Continental’s plaudit-attracting ContiWinterContact TS850 tyres to the test on my Citroen XM, I leapt at the opportunity.

Winter tyres Citroen XM

XM awaits fitment of its winter tyres – grippy!

I’m wary of letting tyre monkeys loose on hydraulic Citroens, so a local garage fitted the tyres to a spare set of rims and I fitted the wheels myself. It also allowed me to check the brakes over – rear pads needed soon. If you have the storage space, another set of wheels is the easiest solution. Then you can simply swap back when spring arrives. Some keep winter tyres on all year round, but motorway miles will quickly wear out the softer compound of a winter tyres on warmer days, so I’ll be changing back.

There are two main changes to a winter tyre to make it more grippy. One is the compound – it’s softer. You don’t have to be a huge Formula 1 fan to know that a softer compound gives more grip. As with the summer motorway scenario, softer tyres will also wear more quickly when pushed hard in hot conditions. The other change is sipes – cuts in the tread blocks themselves that make it easier for the tyre to collect snow. If you’ve built a snowman, you’ll know that snow sticks very well to snow!

Tyre sipes

Extra sipes for extra traction

So, are winter tyres really all good? Well, there are some downsides. One is that you need to fork out for a full set of tyres. I’d be very wary about only putting winter tyres on one end of the vehicle. At £50-60 per tyre for these ContiWinterContact TS850s according to The Internet, that’s a fair chunk of cash. However, chances are, you’re taking off a set of summer tyres that still have grip left. Store them well (indoors, away from UV light) and you can put them on again next year. So, chances are you won’t need to buy any more tyres for a while. You do need storage space, but some tyre suppliers offer to store your summer tyres over winter – and vice versa. Have a natter with them.

In use, winter tyres do tend to be a little noisier, but it’s not that noticeable. In theory, they are also less good at hard cornering, as the softer compound makes the tyre less stable. Having driven rather frenetically on winter tyres in a variety of cars, I can’t say this seems to be a real issue.

Naturally, I haven’t had chance to put the Continentals through their paces yet, but stay tuned. Once winter properly descends, I’ll be able to see just how good they are. Incidentally, winter tyres can deliver benefits whenever temperatures drop below 7 degrees centigrade. Don’t make the mistake of thinking they’re only good in snow. They are winter tyres, not snow tyres!

2CV fettling moves up a gear

With my 2CV Mojo fully reignited, there has been a flurry of recent work. At the 2CVGB National, I was forced to undertake some exhaust repairs and an examination of the tyres when I got home revealed further issues. Three tyres were borderline illegal and the remaining one was close. That’s pretty serious wear given that one pair of tyres was fitted new two or three years ago, while the other set was probably getting on for 40,000 miles and something like six years. Badly worn inner edges up front suggest a tracking issue, but it must also be pointed out that I do drive my poor 2CV rather briskly. I think the oldest pair of tyres probably saw action at the Haynes Motor Museum test track too.

So, first step – new tyres. I considered Michelins, but cashflow concerns soon put paid to that idea. In my experience, Michelins don’t seem to last all that long compared to cheaper tyres. Toyo offer a thoroughly decent budget option, with ECAS 2CV Parts selling a set of four for just £136.84 plus delivery. They’re rated at only E for wet weather grip, and I must admit that as the tread wore, understeer did begin to creep in when the road surface was damp. They’ll have to do for now though. They’re superb in the dry and a lot cheaper than the £89-each Michelins (125 or 135 – I prefer the latter).

Moduron Hafod Garage fitted the tyres

Moduron Hafod Garage fitted the tyres

While the chaps at my local garage fitted the tyres, I was able to actually put some air in the spare, which was comprehensively flat. It’s very difficult to balance 2CV wheels, as there is no centre hole, but in my experience, balancing is not needed with a 2CV. The tracking remains on the To Do list. Seized adjusters mean that job will not be fun, and angle-grinder action may be needed!

With new tyres fitted, we then drove to Wiltshire and back for a family gathering and a light spot of work research on the way. The only real issue on the trip was that my dear lady wife complained about the sagging front bench seat. I remedied that this week by swapping in a pair of original-type front seats that have been living in the loft for some years.

Bench gone, back to single front seats

Bench gone, back to single front seats

It’s amazing what a difference they make! I now sit a good few inches higher up, with a much better posture. The only downsides are that the near-useless sun visor gets in the way, as does the interior mirror. I did try removing rubber rings – the suspension medium for the seats – but it hasn’t helped much. I’ll see how I get on with them. A popular option is to fit Citroen BX front seats, but these are no longer so plentiful, and they do almost entirely remove rear leg space – though I don’t very often have passengers.

With new seats in place, I had a quick-ish 64-mile drive to my ‘local’ 2CV specialist – Sparrow Automotive. Pete was good enough to give me a few instructions but leave me to crack on with the work myself. This pleased me very much – I’m a journalist who actually does like to get his hands dirty, even if he’s not hugely competent with spanners!

Pete Sparrow instructs Ian on track rod end removal

Pete Sparrow instructs Ian on track rod end removal

Pete also let me use his tools, which is good. One of the reasons I’d made the journey was that I didn’t own the special tool I needed to remove the track rod end. Nor do I own a two-post lift, which really does make life easier! It was a marvellous day. I had the editor of the Citroen Car Club magazine taking photos for me, the current 2CV Racing Club UK champion instructing me and the creator of the 4×4 2CV chassis just happened to be visiting. Louis Barbour, the man behind the 4×4 2CV, is someone I’ve known of for many, many years, but this was the first time we really, properly met. Given he now lives in Croatia, which was quite a chance and we all had a good natter over lunch and I somehow now have an idea lodged in my head for fitting my 2CV with a Quaife limited slip differential. Hmmm.

I must say, I had a thoroughly marvellous time. It was great to have nice folk with tons of knowledge to hand, as well as access to fabulous tools and lift equipment. Rather different to scrabbling around on my driveway and having to dash indoors to use the internet to find a solution to whatever problem I’ve found!

Pulling the track rod ends apart was very easy really. There’s a short arm on each hub on top of which is a ball – this is the track rod arm. This sits in a housing on the end of the track rod – which attaches to the steering rack at its other end. Naturally, the ball wears with time. I know one track rod end was replaced on this car at some point, but I’ve a feeling it was at least 60,000 miles ago. Pete judged the ball and the cups it sits within to be within tolerance, so everything was cleaned well, greased up and reassembled. When retightening the threaded nut, the rule of thumb is to nip it right up, then back off half a turn – or thereabouts as you need to line up holes for a split pin. I also fitted 2CVGB SPOG castle nuts that have a grease nipple fitted (also available from ECAS). Hopefully this will extend the life of the £65+ track rod arms. New gaiters were also fitted, along with new split pins. A warning here – if the track rod ball has worn too much, you can’t simply adjust it. Doing so, when the ball has become oval, can create forces sufficient to snap the ball off the arm completely, with disastrous results. It must be possible to operate the steering with no tight spots during its travel.

I did mention the tracking, but it was decided to order up new track rod adjusters before commencing on that work. It’s likely that the old ones – which haven’t been touched for many years – are entirely seized and will need to be cut off. This work will take place once new adjusters have arrived.

While this work was going on, a split driveshaft gaiter was found, and all the securing clips were replaced due to corrosion. On the drive home, the slight rattle I’d noticed in the steering had gone. Brilliant. It would have been easy to write off such a slight wobble as a wheel balance issue, but 2CVs aren’t like normal cars. In fact, working on the car really did highlight how truly great the engineering is. It’s engineering you can really feel.

I’ve clocked up almost 400 miles in the 2CV in just four days now. Aside from needing earplugs due to the sheer noise, the 2CV has reminded me that it’ll quite happily cover that sort of mileage. The only problem is with my hands. Gripping that skinny steering wheel, on over 400 miles of largely-twisting roads, has left the joints in my fingers quite sore! I may need to consider upgrading to the single-spoke steering wheel fitted to 2CV Clubs and Charlestons. It has a thicker rim, as well as looking wonderfully Citroen-ish!

mid-Wales Elan Valley

An Elan Valley view on the drive home. Water levels are low!

Naturally, the perilous state of my 2CV’s bodywork was discussed during my specialist visit. At the moment, I’ve decided I can make no plans about this car’s future, other than sticking to my plan to get her to 200,000 miles before the MOT runs out in April. With the mileage now at almost 198,000, that shouldn’t be too tricky.

Part Worn Tyres – are they a good idea?

As budgets get pinched, lots of people are considering part-worn tyres. After all, a part-worn good-brand tyre may be cheaper than a brand new budget tyre. Which might be rubbish. But are part worn tyres safe? Will buying them actually save you money?

Let’s start with safety. It’s certainly true that worn tyres affect stopping distances far more than you might expect. The British Rubber Manufacturers Association (BRMA) commissioned MIRA to study the effects of tread depth on stopping distances. This study found that on smooth asphalt, the difference between tyres with 6.7mm of tread and the legal minimum of 1.6mm was marked. In short, there was a 36.8% increase in stopping distance in wet weather conditions. That’s pretty huge and could be the difference between a near-miss and a dangerous accident. You can find more details on the RoSPA website.

Less tread = less grip

Less tread = less grip

That study led RoSPA to recommend that tyres be changed at 3mm – well before the legal limit of 1.6mm over 75% of the tyre’s width. In Germany, the limit is already 3mm – this is one source of cheap part-worns. That said, it’s not unusual to see part-worn tyres with 5mm or even 6mm of tread remaining. Presumably this is where a set of tyres has been replaced and not all were entirely worn to the limit in that country. Or they’re considered not worth re-fitting if removed to allow winter tyres to be used.

I personally don’t go in for the scaremongering that surrounds part-worn tyres. Some go on about how you have no idea of the history of the tyre, but that’s true every time you buy a car that isn’t brand spanking new. Do you fit a full set of brand new tyres every time you buy a car? No, I thought not.

But it is tricky to know what’s best sometimes. I’ve opted to buy brand new tyres for my 2CV recently. I couldn’t afford a full set of range-topping Michelins, so had to opt for the Toyo budget tyre. In my experience, it’s a really good tyre, but on the new European tyre ratings, it scores a lowly E for wet weather grip. I must concede, the car does understeer a fair bit in the wet when really pushing on. Might I have been better off seeking a part-worn set of Michelins instead? Possibly – though that leads to other issues. Michelins typically have a low wear rate, so a tyre with lots of grip could be ancient. Has the sidewall started cracking? Has the compound gone all hard? It might still be a liability in an emergency situation. But even by fitting brand new tyres, I’ve boosted the stopping power of the car. Poor tyres with lots of tread are still better than the same poor tyres with very little tread!

And that’s the biggest problem with tyres. Even rubbish ones can be ok for 99% of the time. It’s when you really need them – an emergency stop in wet weather, or an emergency swerve – that you can all too swiftly discover their limitations. I still recall binning a set of Goodyear tyres on a Peugeot 306 after an old lady stepped out in front of me. As I hit the middle pedal, the car locked up far too easily! Fortunately, I think the resulting skid actually helped me miss her. Despite that, I bought a brand new set of Avon tyres and both stopping and acceleration were immediately boosted in the wet. No more wheelspin. Far harder to force a lock-up.

So, this piece has no conclusion to offer I’m afraid. I can’t demand you always buy the best tyres out there, because I’ve just failed to do that with my 2CV. The Rover on the other hand wears really good rain tyres – it has much more performance and more weight to control in an emergency. I certainly wouldn’t rule out part-worn tyres, but I would aim for a really good brand. The near-limit Bridgestone tyres the Rover was wearing when I bought it were actually still very grippy. The cheap, Chinese tyres with lots of tread were not as stable during harsh, damp cornering. All I would say is think long and hard and consider the stopping distance rule. Whatever the tyre, less than 3mm of grip can have a very detrimental effect.

Sirion loses its electricity & bump starting

Few things are more frustrating than a car that won’t start. These days, it’s easy to take it for granted that you turn the key/press a button and it fires up and away you go. A far cry from the struggles of my Dad’s Austin Montego on a damp winter’s morning, when you could play ‘count the number of cylinders actually firing.’ It often seemed to be less than the Sirion’s three-pot engine…

The 2CV demonstrates healthy charging, last year

The 2CV demonstrates healthy charging, last year

What was really silly with the Sirion is that I’d pulled into a lay-by to fiddle with a camera. I turned the engine off but forgot about the headlamps – it was a murky, wet day so I’d turned them on. As I didn’t get out of the car, the headlamp warning didn’t activate. After what I’m sure was only five or six minutes, I went to restart the engine and got that awful slow-starter noise. Bother. It wouldn’t turn the engine quickly enough for it to start, and then it quickly wouldn’t turn the engine at all.

I didn’t have my mobile phone with me, so I was faced with either a long walk home in the rain, or bump starting it. Bump starting a car with a catalytic converter is seen as a bit of a no-no as it can in theory poison the cat. I didn’t really care. I just wanted to get home. Why don’t modern cars have starting handles? The ground was flat and the lay-by was not very long – and also had a car parked in it for extra danger. After four attempts, I had utterly failed to get enough momentum up. After bashing my shin as I attempted to quickly leap aboard, I was annoyed. Perhaps that enabled me to push the car a bit more quickly. As the car rolled, I selected second gear, turned the ignition on and briefly dipped the throttle pedal. Fully releasing it I had learn just stopped the car! It was enough. Only just, but the little engine purred into life! Phew.

Silly Sirion

Operator error, not car error

I drove home and pondered the reasons for the electrical fail. A few minutes of headlamps should not a battery flatten. Was it actually charging? The fact that I got home suggested it was, and a multimeter across the battery terminals confirmed this – 14.2 volts. A healthy number of volts in a 12 volt system. Certainly, the car was happy to start on its own without further bumpery.

So, the likely candidate is the battery. It’s a tiny battery on the Sirion, so its capacity is not astonishing. In the days of constant churning before an engine caught, this might have been an issue, but Japanese cars seem to start very nicely indeed. I suspect this one might be the original though, so it may be reaching the end of its life. That happens. The big test will be next winter, when the weather turns cold again. I’m not planning to replace the battery until I have to though, but will certainly avoid leaving the lights on in future!

The bump start technique

Bump starting a car is a useful trick if the battery goes flat, but first, some warnings. Bump starting requires the car to be moving without the engine working. That means that the brakes will gradually stop working as the servo pressure reduces. Also, the steering will be much heavier where it is usually assisted. Plan accordingly, remember where the handbrake is. Also try to plan what happens if the engine still doesn’t catch. Have an escape plan that doesn’t leave you blocking a road!

1) Turn ignition on. This also ensures that the steering lock is free. Gearbox in neutral, handbrake off, use gravity, push or recruit pushers.

2) Once the car is moving, and a slow jog is probably enough pace, select second gear and GENTLY ease up the clutch. You don’t have to jolt it. Once the engine catches, dip the clutch and bring the car to a halt. Simple!

Further warnings. There have been rumours of diesels shattering their clutches during bump starting, which emphasises the need to be gentle with the clutch release. I’ve done it enough times with diesel BXs to regard it as not an issue. I’m not sure some modern cars can even be bump started. A good reason to avoid them. Naturally, bump starting on the road is fraught with danger! Especially if the battery is so flat that you can’t deploy hazard lights. You have been warned!

Other electricity tips

Other options are jump starting, with safe jump leads or a jump pack, or using a starting handle if you’re lucky enough to have one! With jump leads, remember that the negative cable should go from the good battery negative terminal, to a good earth point on the car with the flat battery. That’s safer than connecting directly to the battery as sparks may ignite the gases a battery naturally produces. They really do go bang! With a starting handle, keep your thumb in. Don’t wrap your hand around the handle as it might kick back and break your thumb. Ouch!

Sirion: More brake trouble

Just over a week ago, the Sirion’s brakes seized in a rather unpleasant manner. I pride myself on feeling a problem well before it becomes dangerous. With only 54bhp, the resistance caused by a binding brake was enough to arouse my suspicions. I shouldn’t have to accelerate downhill! Then I detected a wheel wobble. I was hurtling down a very steep hill at the time so I cautiously applied the brakes and pulled over. Sure enough, the nearside front wheel was hot to the touch. I’d only travelled about a mile from home! Ideally, I would have had something big and made of metal with which to wallop things – that can often force a sticky caliper to retract, or a stuck pad to free itself. I had no tools so just have the wheel a good kicking. This, amazingly, did free things up enough for me to drive another couple of miles to my destination.

I drove the car home the next day with no problems at all, but the very next journey revealed the same symptom. Life got hectic for a week and so the Sirion had to sit on the driveway and await some spare time.

That finally arrived today, so I began to strip down the caliper. It’s a floating caliper, so the first task was to remove the slider bolts. I’d replaced these not long ago and I could quickly eliminate them from my enquiries. With the caliper free, I could see if I could push back the piston. I could not. I opened the bleed nipple and tried again. Same story. This at least confirmed that the flexible brake hose wasn’t at fault – they can degrade internally and act as a one-way valve.

The only conclusion remaining was that the piston had seized into the caliper. I looked up the price of new calipers. Eek! At least £65. I looked up the price of a new piston and drew a blank. Not being particularly flush with cash at the moment, I decided to remove the piston and see how bad things were.

Icky piston

Icky piston

Removing the piston was quite easy. One option is to use compressed air. The other is to use the power of the braking system. I opted for this one. It involves pressing the brake pedal down until the piston comes out. Make sure there’s something beneath the caliper to catch all of the soon-to-be-free brake fluid! I did it gently, in stages. Press pedal, go and have a look, press pedal, go and have a look etc. Eventually, it popped gently out. Then I put a hose clamp on the brake pipe and undid the union on the caliper. The piston didn’t seem too bad really – a bit grotty in places perhaps. A good clean with a cloth improved things, and I used a very light emery paper to smooth things even more. Be very careful not to overly scratch the surface of the piston.

With the piston out, I could see that corrosion had built up on the bore, especially between the two rubber seals. I didn’t have a seal kit, so had to carefully clean the face of the bore – a screwdriver for the big chunks, then emery again. After that, I had to clean out the bore and seals very carefully. Any muck here is only going to give a problem later. With everything clean, I dug out the red caliper grease and applied that to the seals. I also smeared a little over the piston itself to aid its refitment. That worked a treat and it slipped home beautifully. I refitted the caliper and pads, bled the caliper (keeping a close eye on the level in the master cylinder – it needed a fair bit of topping up) and had a successful test drive.

Daihatsu Sirion yellow

The Yellow Peril is still in the good books, and now stops!

The internet is full of people asking which grease they should use for calipers. I use red caliper grease for the piston, seals and sliders. Some claim it isn’t suitable but my experiences so far are that it is. Lithium-based greases can be bad news as they can destroy the seals and apparently don’t react well with DOT brake fluid. Certainly, you should NEVER use copper grease. This is not a suitable application. It’ll just turn into a sticky gunge and will definitely cause you problems!

It’s good to have the little Sirion back in use again. It makes me laugh with its daft looks and ridiculous exhaust bark. Six months this car has survived on the fleet. Will it make it past the tricky eight month stage?